

Home Decor
Coving Orientation: 5 DIY Steps to Avoid Reversed Mitres

Oct
Coving fits with the flatter, longer edge against the ceiling and the shorter return against the wall, and we mark that ceiling edge with a black line before any cut is made. Getting this right matters because mitre direction flips depending on whether you are cutting for an internal or an external corner. Mark first, dry-fit always, and the rest of the job falls into place.
TL;DR:
- Mark every length and offcut along the ceiling edge, then place that line against the mitre box base and the wall edge against its fence.
- For internal corners, the wall face should be longest after cutting; for external corners, it should be shortest, so confirm both edges meet before fixing.
- Sand a slightly proud edge or pack behind coving to bridge shallow wall gaps, but recut mitres with gaps over a millimeter or two.
- Apply specialist polyurethane adhesive along both contact edges, letting it slightly overspill the back groove; generic filler is not the recommended substitute.
- If stepladder work will exceed 30 minutes, consider another access method, and measure and cut at ground level before climbing.
Table of Contents
- How to identify and mark the ceiling side before you cut
- How to seat coving in a mitre box (flip technique and why it matters)
- Which way to cut for internal vs external mitres
- Dry-fitting: how to check joints and when to re-cut or pack
- Fixing and adhesives: how to get a secure, long-lasting bond
- Working on uneven walls and imperfect corners
- Safety and work-at-height: HSE practical guidance for DIYers
- Carl’s Installer Tip: practical technique from Coving.Online
- Tips for handling and storing coving to maintain correct orientation
- How lighting affects perception of coving orientation
- How to correct coving if installed the wrong way round
- What this project really teaches about orientation
- Order coving or book installation with Coving.Online
- FAQ
- Sources
How to identify and mark the ceiling side before you cut
On most coving profiles the ceiling face is the longer, flatter surface, while the wall face sits at a steeper angle and often carries more detail. Symmetrical coving can be harder to read by eye alone, so we rely on the manufacturer’s own convention rather than guesswork. Orac’s installation instructions set out a simple marking system: draw a black line along the ceiling edge of every length before you touch the saw.
This single habit prevents the single most common fitting error we see: a piece cut the wrong way round and discovered only when it is held up to the corner.
Before cutting anything, run through this checklist:
- Hold the profile against a short offcut or the end of the pack to confirm which edge the manufacturer intended for the ceiling.
- Mark the ceiling edge with a pencil or black marker along the full length of each piece.
- Mark every offcut as well as the main length, since a small scrap with no line is easy to flip by mistake.
- Lay marked lengths face-up in the order you plan to fit them, so you are not re-checking orientation mid-install.
A few minutes spent marking an entire room’s worth of coving saves far more time than it costs, and it is the step most DIY guides skip.
How to seat coving in a mitre box (flip technique and why it matters)
The mitre box only gives you an accurate cut if the coving sits in it exactly as it will sit on the wall. Orac’s installation guidance describes this as the ‘flip’ technique: the black-lined ceiling edge goes to the bottom of the box, resting against the base, with the wall edge standing up against the back fence.
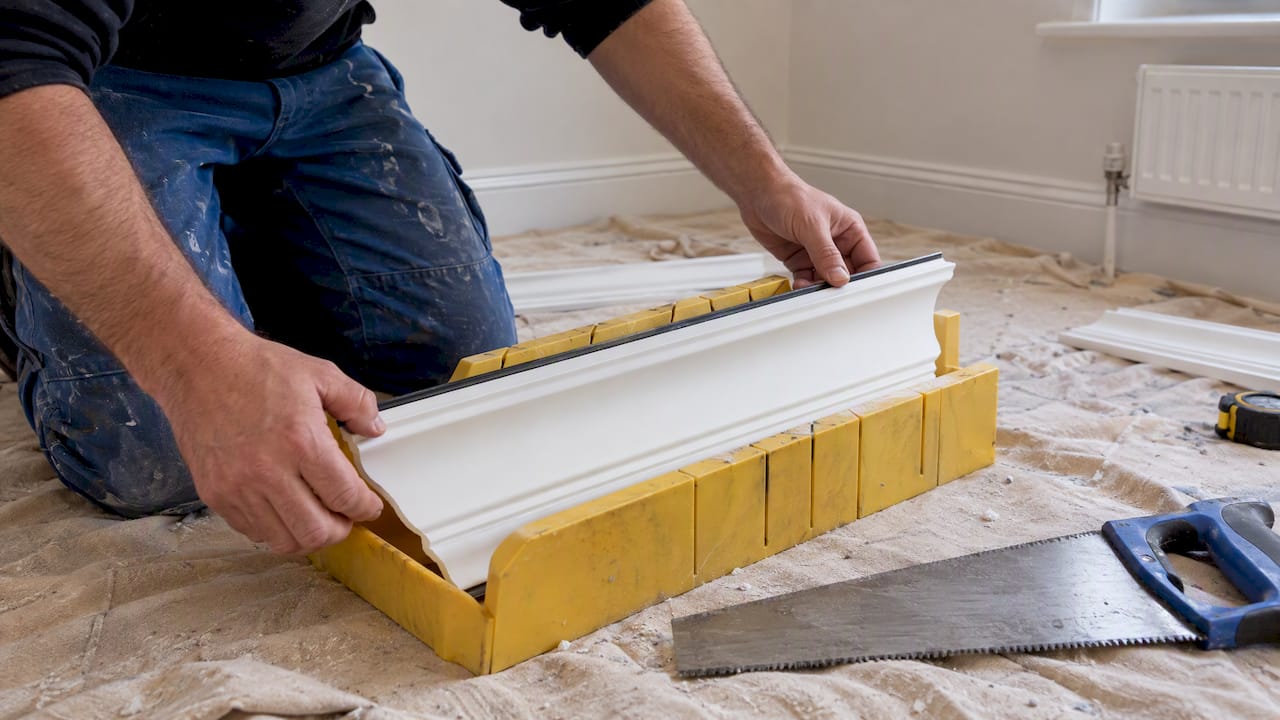
This matters because the fence and base of the mitre box replicate the ceiling and wall in miniature. If the profile sits upside down, the saw will cut the correct angle but on the wrong face, leaving you with a mirrored mitre that cannot meet its partner piece cleanly.
Follow this sequence for every cut:
- Place the marked ceiling edge flat against the base of the mitre box.
- Push the wall edge firmly against the back fence so the profile cannot rock during the cut.
- Confirm the saw guide is set to the correct angle for an internal or external corner before lowering the blade.
- Hold the moulding steady with one hand well clear of the cutting line and saw in slow, even strokes.
- Check the cut face against the marked line once finished, before removing the offcut.
Pro Tip: In our experience, a fine-tooth tenon or mitre saw gives a cleaner edge on polyurethane coving than a coarse wood saw, and it reduces the crumbling you sometimes get at the tip of a mitre.
Which way to cut for internal vs external mitres
An internal corner is where two walls meet and the angle points into the room, such as a standard corner of a bedroom. An external corner points outward, like the corner of a chimney breast or a stud wall that projects into the space.
The direction of the 45 degree cut reverses between the two. For an internal corner, the wall face of the coving should end up as the longest edge after the mitre, while for an external corner the wall face becomes the shortest edge. Cutting it the wrong way round produces a mirrored piece that will not meet its neighbour at the apex, leaving a gap at the front or back of the joint.
Before fixing anything, run a quick check:
- Hold both cut pieces together, unglued, at the corner to confirm the mitre lines meet without a gap front or back.
- Look along the top ceiling edge and the bottom wall edge separately, since a mismatch often shows on one edge before the other.
- If the joint gapes at the tip, you most likely need to flip the piece rather than keep adjusting the angle.
Dry-fitting: how to check joints and when to re-cut or pack
Dry-fitting the entire run before any adhesive goes anywhere is the step that separates a tidy job from a frustrating one. Step-by-step DIY guidance recommends offering up every length and checking each joint before committing to glue, because small adjustments are easy now and difficult once fixed.
Work through a full dry-fit in this order:
- Offer up each piece along its marked guideline, checking it sits flush at both the ceiling and wall edges.
- Check every mitre joint by eye and by running a finger along the seam to feel for a step.
- Use a small offcut as a spacer to test awkward corners before committing to the final cut.
- Note any joint that needs attention and label it, rather than trying to remember which one it was later.
Light sanding with fine abrasive paper can close a slightly proud edge, and a thin packer behind the moulding will correct a shallow gap caused by an uneven wall. A joint that gapes more than a millimetre or two at the mitre tip, however, usually means the angle itself is wrong, and re-cutting is quicker and neater than trying to fill it.
Fixing and adhesives: how to get a secure, long-lasting bond
Polyurethane coving from ranges such as Orac Decor and NOËL & MARQUET is designed to be fixed with a purpose-made polyurethane or specialist coving adhesive rather than a generic filler. Manufacturer guidance recommends applying adhesive so it slightly overspills the V-groove on the back of the profile, since a bead confined entirely within the groove can leave the bond weaker under movement or temperature change.
A few practical points make the fixing stage go smoothly:
- Apply adhesive in a continuous bead along both the ceiling and wall contact edges, not just a few dabs.
- Press the piece into place and hold it with light support until the adhesive grips.
- Use panel pins sparingly on longer runs or heavier profiles, then fill and sand the pin holes flush before painting.
- Wipe excess adhesive from the surface while it is still soft, rather than letting it skin over.
Pro Tip: We’ve found that a flexible decorator’s caulk, applied with a wet finger along the finished joints, gives a smoother line than filler alone and takes paint evenly once dry.
Once joints are filled and sanded, a light coat of mist primer helps you spot any remaining imperfections before the final paint goes on. For adhesive-safe fixing that keeps a profile’s warranty intact, see our guide on fixing polyurethane coving with approved adhesives.
Working on uneven walls and imperfect corners
Few rooms are perfectly square, and coving that blindly follows a bowed wall will look crooked even when every mitre is cut correctly. The more reliable approach is to strike a level guideline with a spirit level or laser line and fit to that, rather than to the wall or ceiling itself.
Where the gap between coving and a dipping wall becomes visible, a combination of techniques keeps the finish looking clean:
- Pack behind the moulding with thin shims where the wall dips away from the guideline.
- Run a slightly heavier adhesive bead on the hollow side of a corner to bridge small irregularities.
- Finish with flexible caulk or filler along any residual gap once the adhesive has cured.
For walls with a pronounced bow or a corner that is noticeably out of square, our detailed piece on installing coving on uneven walls covers the scribing and packing techniques in more depth. Severely uneven surfaces, particularly in older properties, are often better handed to a professional installer who can scribe and pack accurately without compromising the line of the room.
Safety and work-at-height: HSE practical guidance for DIYers
Fitting coving means spending time above head height, and the Health and Safety Executive’s ladder guidance is worth following even for a single room. HSE advises that where a task on a stepladder would take longer than 30 minutes, you should consider an alternative form of access, and plan the work to reduce time spent at height generally.
Practical steps keep you off the ladder for longer than necessary:
- Measure, mark and cut lengths at ground level before climbing at all.
- Use a podium step, hop-up platform or tower scaffold for longer runs instead of repeatedly repositioning a ladder.
- Check any ladder or podium is on firm, level ground and locked before each use.
- Consider hiring a mobile elevating work platform for high ceilings or extended cornice work.
Breaking the job into short bursts at height, with preparation done on the ground, is the single change that cuts risk the most.
Carl’s Installer Tip: practical technique from Coving.Online
In our experience, the two mistakes that undo an otherwise good coving job are a missing ceiling-side mark and a skipped dry-fit. Mark both the main length and the offcut, apply adhesive so it just overspills the groove rather than sitting shy of it, and always offer the piece up dry before you commit to glue.
We’ve found that keeping a small stock of the matching Orac Decor or NOËL & MARQUET profile on hand saves a trip mid-job if a length is cut short. Our shop stocks the adhesives and mitre tools that make this stage easier, and our guide to mitre angles is worth a read before your first cut.
Tips for handling and storing coving to maintain correct orientation
Once a length is marked, how you store and carry it matters almost as much as how you cut it. Coving left loose in a van or propped against a wall can pick up scuffs on the face edge that make the orientation harder to read later, and a mark drawn in pencil can rub off against other lengths.
A few habits keep orientation clear from delivery to fitting:
- Store lengths flat or stacked on their least detailed edge, never leaning on the marked ceiling face.
- Use a permanent marker rather than pencil for the ceiling-side line, since pencil fades with handling.
- Carry long lengths with two people where possible to avoid flexing or snapping the profile, which can also obscure marks near the ends.
- Keep offcuts with their parent length until the room is finished, rather than mixing them into a general scrap pile.
Polyurethane coving is light but can bow slightly if stored upright for long periods, so laying lengths flat on a clean, dry surface until you are ready to cut keeps both the shape and the marking intact. If you are working through several rooms over a few days, label each length with the room and corner it is destined for as well as its orientation, so nothing gets mixed up between sessions.
How lighting affects perception of coving orientation
Natural daylight and artificial downlights change how obvious a wrongly oriented piece looks once it is fixed. A coving profile that seems fine under a single bare bulb can reveal every joint and angle discrepancy once the room is lit from multiple directions, particularly where wall-washing or cove lighting throws shadows along the ceiling line.
Strong side lighting, from a window or a wall light close to the ceiling, tends to expose any step or gap at a mitre far more clearly than overhead light does. This is one reason it pays to dry-fit a corner and view it under the room’s normal lighting, not just daylight from a single window, before gluing anything in place. A joint that looks acceptable in flat midday light can show a visible shadow line once evening lamps are switched on.
If you are planning to run LED strip lighting within or behind the coving, this effect is worth considering at the design stage rather than after fitting, since the light source itself will highlight the profile’s edges and any orientation error along with it. Our guide to adding LED lighting to coving covers the design choices that work best alongside this kind of lighting.
How to correct coving if installed the wrong way round
A piece fixed the wrong way round is usually easiest to spot once the adhesive has cured and the light catches the joint awkwardly, or when the next length refuses to meet it cleanly. The fix almost always means removing the piece rather than trying to disguise the error with filler, since a reversed profile changes the angle at both the ceiling and wall edges, not just at the corner.
To remove a wrongly fixed length, work a thin flexible scraper or filling knife gently behind the moulding, starting at one end and working along, rather than pulling from the middle. Polyurethane adhesive can be stubborn, so patience here avoids damaging the profile or the plaster behind it. Once removed, scrape away old adhesive from both the wall, ceiling and the back of the coving before re-marking the ceiling edge and re-fitting.
Treat the re-fit as a fresh installation: re-check the mitre direction against its neighbouring pieces, dry-fit before gluing, and apply adhesive so it overspills the V-groove as described earlier. Taking the extra few minutes to mark and dry-fit properly the second time round is far quicker than a third removal.
What this project really teaches about orientation
The most useful lesson from fitting coving is not the geometry of a 45 degree mitre, it is the discipline of marking before cutting. Most DIY guides focus heavily on angles and saws, yet the errors we see most often trace back to a missing ceiling-side mark rather than a miscalculated angle.
Conventional advice tends to treat orientation as something you judge by eye on the day. That works for an experienced installer who has handled hundreds of lengths, but it leaves a first-time fitter guessing at the exact moment a mistake is easiest to make, right before the saw touches the moulding.
If you take one thing from this guide, make it the habit of marking every length and every offcut before you cut anything, and dry-fitting every joint before adhesive goes anywhere near it. Angles and adhesive choice matter, but they only pay off once orientation is settled.
— Carl
Order coving or book installation with Coving.Online
We stock a wide range of polyurethane coving profiles, along with the adhesives, mitre tools and fixings you need to get a project like this right the first time. If you would rather hand the cutting and fitting to someone else, we can arrange professional fitting through an installer network.
- Browse our cornice and coving range for the profile that matches your room.
- Pick up adhesives and mitre accessories suited to polyurethane coving.
- Arrange professional installation through our installer network if you would prefer the job fitted for you.
Whether you are cutting your first mitre or planning a full room of cornice, we are set up to supply the materials and the fitting support behind them.
FAQ
What do you use to fix plaster coving?
Plaster coving is traditionally fixed with a plaster-based adhesive mixed to a thick paste, applied to both the ceiling and wall edges before the length is pressed into place. Panel pins or screws are sometimes used temporarily to hold heavier plaster lengths while the adhesive sets, then removed and the holes filled.
Can you put up plaster coving with no more nails?
A gap-filling grab adhesive such as No More Nails can hold lighter plaster coving, particularly on sound, flat plaster, but it is not the adhesive manufacturers specify for polyurethane profiles. For polyurethane coving from ranges like Orac Decor, manufacturer guidance points towards a dedicated polyurethane coving adhesive instead.
How to do coving on walls?
Start by marking a level guideline on the wall and ceiling, mark the ceiling side of each length, then dry-fit every piece around the room before gluing anything. Cut mitres with the marked ceiling edge at the base of the mitre box, check internal and external corners meet without a gap, then fix with adhesive applied along both contact edges.
Do you need corners for coving?
Most coving is mitred on site rather than fitted with pre-made corner pieces, using a mitre box to cut matching 45 degree angles for internal and external corners. Some ranges do offer pre-formed corner blocks for very tight or awkward angles, which can simplify a corner where cutting an accurate mitre by hand is difficult.
Sources
- Orac installation instructions (UK)
- How to fit coving in a UK home: Cut clean corners and fix it securely
- HSE — When and how to use ladders safely
- Fitting coving and cornices – step‑by‑step guide and video
Recommended
- Test Cut Three Times: Coving Mitre Angles, Nested vs Flat Methods
- Homeowners: Calculate Coving with 10%/15% Wastage and Carl’s Tips
- One Twelfth Rule to Match Skirting and Coving for DIYers and Pros
- Carl’s Installer Tip: Ceiling to Wall Transitions for DIYers and Pros
