

Home Decor
Panel Mould Spacing: Formula, 100mm Example and UK Installer Tips

Oct
A wall always has one more gap than panels, so total gap = (panels + 1) × gap width, and panel width = (wall width − total gap) ÷ panels. For most rooms, a reveal of 80 to 120mm works well, with 100mm a sensible starting point. Check profile-specific dimensions against the Orac Decor installation manual before cutting, and we can supply or fit the panelling once your layout is set.
TL;DR:
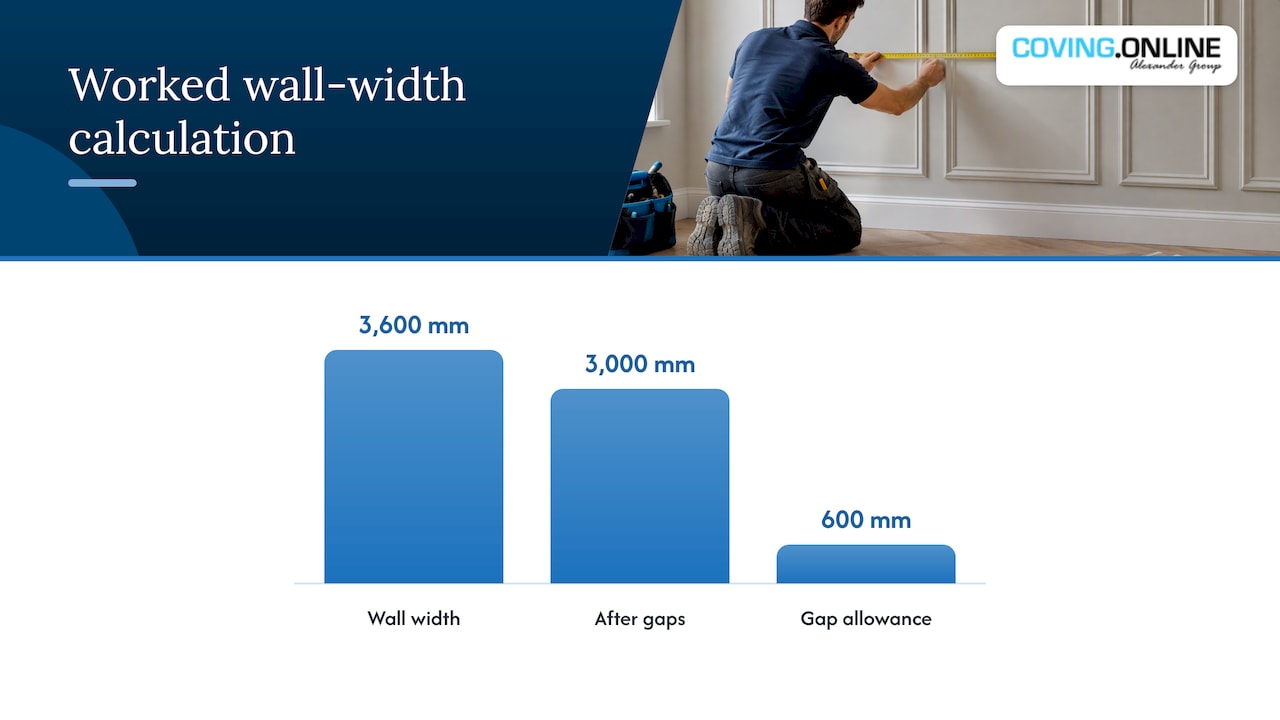
- For five panels across a 3,600mm wall with 100mm reveals, subtract six gaps, then divide the remaining 3,000mm into 600mm panels.
- Center the grid on a fireplace sightline, but shift it around doorways to preserve balanced reveals and spread adjustments across several panels.
- Condition timber and MDF to room temperature and humidity before fixing; use adhesive as well as nails, and follow separate instructions for polyurethane profiles.
- Rooms lit mainly in the evening may need reveals near 120mm, while deep textured panels usually look better with tighter gaps.
- Measure walls at several heights and verify the datum with a spirit level, since older or textured surfaces can distort laser references.
Table of Contents
- How to calculate panel widths and heights
- Choosing the reveal and panel proportions for your room
- Measure, mark and lay out the panels
- Adjusting the grid for doors, windows and features
- Profile lengths, stock, waste and conditioning
- Installation and finishing for neat, consistent joints
- Common panel layout patterns and their visual impact
- How lighting affects the way panel spacing reads
- Spacing guidelines for different panel types
- Wall texture and irregularities: what to check before you start
- Carl’s installer tip: trade-tested shortcuts and pitfalls
- How we can help with your panel mould project
- FAQ
- Sources
How to calculate panel widths and heights
Getting the arithmetic right at the planning stage saves wasted lengths later. The calculation follows the same logic whether you are panelling a short alcove or a full sitting room wall, and it works because every wall has one more gap than it has panels.
- Measure the wall width in millimetres at skirting height, where the panels will actually sit.
- Decide on your gap width, typically 80 to 120mm, and choose how many panels you want across the wall.
- Multiply the gap by (panels + 1) to get the total gap allowance.
- Subtract that figure from the wall width, then divide by the number of panels to get each panel’s width.
Say a wall measures 3,600mm, you want five panels and you have chosen a 100mm gap. Total gap allowance is six gaps multiplied by 100mm, which comes to 600mm. Subtract that from 3,600mm and you have 3,000mm left, divided by five panels gives a panel width of 600mm each.
Vertical calculations follow the same principle for a dado or wainscot band. If your band runs from 900mm skirting height up to a 1,000mm datum line, and you want a 40mm reveal above the skirting and below the rail, your panel height becomes 1,000mm minus 900mm minus 80mm, which is 20mm of usable panel face., so in practice you would set your datum higher to leave a workable panel height.
Rounding matters more than it seems. If your division produces a fraction of a millimetre, round each panel to the nearest whole millimetre and absorb the small discrepancy into the end panels or the end reveals, where a millimetre or two is invisible to the eye.
Choosing the reveal and panel proportions for your room
The gap between panels, often called the reveal, does more to set the character of a room than the panel width itself. A narrow reveal of around 60 to 80mm reads as tighter and more formal, suiting panelled studies or compact hallways, while a wider reveal of 100 to 120mm gives a room breathing space and suits larger, higher-ceilinged rooms.
- Low ceilings and smaller rooms tend to suit narrower reveals and slimmer profiles, which avoid overwhelming the wall.
- Taller rooms and period properties can carry wider reveals and heavier decorative profiles without looking cluttered.
- Shaker-style or picture-frame panelling generally uses a consistent, moderate reveal throughout, keeping the grid feel uniform.
- Heavier, more ornate profiles benefit from a slightly wider reveal so the moulding’s detail does not compete with its neighbour.
Ceiling height and profile scale work together. A tall, deep profile on a low ceiling draws the eye downward and can make a room feel shorter, whereas a slim, shallow profile with a generous reveal lets the wall breathe.
When a wall includes a fireplace, bed or other dominant feature, it is often better to centre the panel grid on that sightline rather than on the strict geometric centre of the wall, even if this means two reveals differ by a few millimetres.
Pro Tip: Keep every reveal on a wall identical rather than chasing a perfectly even panel width. The eye catches an inconsistent gap far faster than a panel that is a few millimetres narrower than its neighbour.
Measure, mark and lay out the panels
Accurate marking turns your calculation into a usable cutting and fixing plan, and it is where most panelling projects go right or wrong. The Orac Decor installation manual recommends measuring and marking carefully before fixing, treating the layout stage as part of the design rather than a formality before cutting begins.
Before marking anything, gather a tape measure, a laser level, a spirit level, a straightedge, a pencil, a spacer block cut to your chosen reveal width, a mitre saw and a set of clamps.
- Measure the wall width at several heights, since skirting height and cornice height rarely match exactly on an older wall.
- Use the laser or spirit level to establish a horizontal datum line, usually just above skirting board height.
- Mark the edge reveals first, working in from each corner by your chosen gap width.
- Plot each panel line along the datum, using your calculated widths and checking with the spacer block as you go.
- Dry-fit the first panel and its mitred corners before committing any adhesive, confirming the marked lines match the actual panel.
Out-of-square walls are common, particularly in older housing stock. Measure at several heights and either work to the smallest consistent measurement, which keeps every panel safely within the wall, or accept a slight visual compromise where one reveal tapers by a millimetre or two across the run, which is far less noticeable than a panel that will not fit.
Returning to the earlier worked example, once your five 600mm panels and six 100mm gaps are marked against the datum line, a dry-fit across the whole wall confirms the maths before a single mitre is cut.
Adjusting the grid for doors, windows and features
Few walls run uninterrupted from corner to corner, so the grid usually needs a practical adjustment around doors, windows or fireplaces. The aim is for the panelling to look planned around the feature, not squeezed to fit it.
- Reduce the panel count across that section of wall rather than forcing the original number past an opening.
- Centre a panel or frame directly on a dominant feature, such as a fireplace, even if this shifts the whole grid slightly.
- Shift the entire layout a small amount sideways to preserve equal reveals either side of a doorway rather than leaving one side cramped.
- Spread any unavoidable adjustment across two or three panels instead of compressing it into one narrow end panel.
- Plan bespoke cutouts for radiators, switches or wall lights where a panel edge would otherwise land awkwardly across them.
A quick visual-rhythm check before cutting: centre on the strongest sightline in the room, keep every reveal the same width, and hold a full-size paper or card mock-up against the wall to confirm it reads well from normal viewing distance rather than from a tape measure.
Profile lengths, stock, waste and conditioning
Ordering enough material, and the right material, avoids a frustrating mid-project delay. Orac Decor profiles are supplied in a range of standard lengths, and exact dimensions vary by product line, so always check the specific listing before finalising a cutting list.
- Allow extra length for mitre cuts and offcuts, since every internal and external corner consumes material beyond the straight panel length.
- Plan joins along longer runs so they fall behind a panel edge or at a natural break, rather than mid-span where they catch the eye.
- Order slightly more than the bare calculated total, since a miscut mitre or a damaged length is far cheaper to replace from spare stock than to reorder mid-project.
- Condition timber and MDF mouldings to the room’s temperature and humidity before fixing, as recommended in WPIF PanelGuide, to reduce the risk of buckling or gapping later.
- Follow manufacturer guidance for polyurethane profiles, which behave differently to timber and MDF and have their own fixing and conditioning instructions.
WPIF guidance also stresses priming before fixing and favours adhesive fixing over nails alone for MDF and timber mouldings, which reduces the risk of movement once the panelling is in place. Polyurethane profiles from our Panelling range follow a similar adhesive-first approach, with specific guidance in the manufacturer’s own instructions.
Installation and finishing for neat, consistent joints
Good finishing is what separates a panelling job that looks fitted from one that looks stuck on. Dry-fit every mitre before any adhesive goes near the wall, and where a run includes a top rail or capping piece, fix that first so the vertical panels can be measured and cut against a fixed reference line.
Use your spacer block throughout, not just at the marking stage, and hold panels with temporary clamps or masking tape while adhesive cures so reveals do not drift before they set.
- Dry-fit every mitred corner and check it closes tightly before applying adhesive.
- Fill small mitre gaps and seams with a flexible decorator’s caulk, then sand once cured and before the final coat of paint.
- Walk the room and check the sightline across all panels, then check diagonals on each panel to confirm it is square rather than relying on the wall alone.
- Common mistakes include skipping the dry-fit stage, fixing before the material has conditioned, and rushing the datum line instead of checking it at both ends of the wall.
Pro Tip: Cut one spacer block to your exact reveal width and use it at every single gap, rather than measuring each one by tape. It removes the small human errors that add up across a long wall.
Where a wall is badly out of square or the ceiling height varies noticeably, it is worth calling in a professional fitter rather than pushing a DIY install past its limits.
Common panel layout patterns and their visual impact
Panel moulding is most often arranged in a symmetrical grid, with equal panels and reveals running the full length of a wall, which suits formal rooms such as dining rooms and hallways. An asymmetrical layout, where panel widths vary deliberately around a feature such as a fireplace or bed, tends to look better when judged from the room’s main sightline rather than forced to match a strict measurement.
A full grid pattern, combining horizontal and vertical mouldings into a series of framed squares or rectangles, reads as more traditional and works well on taller walls with the height to support several rows. Running panels vertically, with no horizontal divide, draws the eye upward and can make a room feel taller, while a single horizontal band at dado height does the opposite, visually lowering the ceiling and anchoring the room.
Mixing vertical and horizontal elements, such as a dado-height run topped with narrower vertical panels above, gives a layered effect but needs careful planning so the gaps align logically rather than competing with each other. Whichever pattern you choose, consistent reveals across the whole wall matter more to the finished look than achieving mathematically identical panel widths, and most layouts that look wrong on completion trace back to an inconsistent gap somewhere along the run.
How lighting affects the way panel spacing reads
Panel mouldings rely on shadow to register as three-dimensional, so the direction and strength of light in a room changes how a given reveal actually looks once installed. A wall lit mainly by a single window to one side will throw longer shadows into the reveals on the far side of each panel, which can make a gap look wider or narrower than it measures depending on where you stand.
Artificial lighting, particularly downlights or wall-washers set close to a panelled wall, tends to flatten shadow and can make a narrow reveal almost disappear at night even though it reads clearly in daylight. Rooms that rely heavily on evening lighting may benefit from a slightly wider reveal, towards the upper end of the 80 to 120mm range, so the gap still registers once natural light has gone.
LED profiles set into or above panelling introduce their own effect, washing light down the wall and emphasising every joint and reveal along the run, so consistency in marking and cutting matters even more under that kind of lighting. If you are planning panelling alongside LED lighting, it is worth testing the lit effect on a sample section before committing to a reveal width across the whole wall.
Spacing guidelines for different panel types
The basic spacing formula holds across panel types, but the practical gap you choose shifts with the material and profile depth. Flat, shallow polyurethane panel moulding, the kind most commonly used for picture-frame or shaker-style walls, works well across the full 80 to 120mm range because its shadow line is modest and forgiving of small variations.
Deeper 3D wall panels, which project further from the wall and often carry a textured or geometric surface, usually read better with a tighter reveal, since the panels themselves already create strong visual interest and a wide gap can start to look disjointed rather than deliberate.
Solid timber or MDF panelling, built up from separate stiles and rails rather than a single applied profile, needs its reveal planned around the actual material thickness and the conditioning behaviour described in WPIF PanelGuide, since timber movement can close or widen a gap slightly over the first season in a centrally heated room. Polyurethane profiles, by contrast, are dimensionally stable once fixed, which is one reason they are a popular choice for a project where reveal consistency matters most.
Wall texture and irregularities: what to check before you start
Few walls are perfectly flat or perfectly square, and surface texture has a direct bearing on how panel mould spacing works in practice. A heavily textured or uneven plaster finish can throw off a laser level’s visual reference, so it is worth checking your datum line against a physical spirit level as well, particularly on older plaster or rendered walls.
Bowed or out-of-square walls, covered briefly in the measuring and marking section above, affect spacing in a second way too: a reveal that looks even at skirting height can visibly widen or narrow higher up the wall if the surface is not flat. Measuring at several heights before marking, rather than relying on one measurement taken at waist height, catches this early.
Where a wall’s texture is too uneven to guarantee a clean adhesive bond, such as heavily textured artex or rough render, a light skim or sanding pass before fixing gives the panel mouldings a flat, consistent surface to sit against, which in turn keeps your marked reveals accurate once the panels are actually in place rather than shifting slightly as they settle.
Carl’s installer tip: trade-tested shortcuts and pitfalls
In our experience, consistent reveals matter more than mathematically perfect panel widths, a reading that nobody has ever stood in a finished room and noticed. The most common mistake we see is skipping the dry-fit stage, closely followed by not conditioning MDF before fixing it. We’ve found that cutting one spacer block to your exact reveal width and using it at every gap removes far more error than any amount of careful tape measuring.
— Carl
How we can help with your panel mould project
We supply the full Orac Decor and NOËL & MARQUET ranges, along with the adhesives and accessories needed to fix them properly once your spacing plan is set.

If you would rather hand the cutting and fixing to someone else, a professional installer network can take your layout from calculation straight through to a finished wall, so you are not relying on a single weekend of careful measuring to get it right. Browse our panelling range to see profiles and reveals in person, or visit our installation page to arrange a professional fit.
FAQ
What is the ideal gap between panelling?
A reveal of 80 to 120mm suits most rooms, with 100mm a common practical default. Narrower reveals around 60 to 80mm suit smaller rooms or a more formal look, while wider reveals towards 120mm suit taller rooms or heavier decorative profiles.
How far apart should wall moulding be?
The spacing comes from a simple formula: a wall has one more gap than it has panels, so total gap allowance equals (panels + 1) multiplied by your chosen gap width. Subtract that figure from the wall width and divide by the number of panels to find each panel’s exact width.
Is panelling outdated in 2026?
Panelling remains a widely used feature in both period and contemporary interiors, with styles ranging from classic shaker frames to modern 3D panels. Current layout guidance continues to focus on consistent reveals and proportion rather than any single trending style, which suggests it is more a lasting design tool than a passing trend.
Is 18mm MDF too thick for panelling?
MDF is a standard thickness for stile-and-rail panelling and is not too thick for most applications, though it should be conditioned to room temperature and humidity before fixing, as set out in WPIF PanelGuide. For applied moulding profiles rather than full panels, a slimmer polyurethane section is often preferred for its lighter weight and dimensional stability.
Sources
- Orac Decor installation manual (panel mouldings)
- Panel moulding layout guide: Spacing, reveals, and quantity planning for wall frames and wainscot
- WPIF PanelGuide (guidance on use of MDF and conditioning)
- Panel spacing calculator and worked example
Recommended
- 5–8% Rule: Installer Proven Coving Sizes for UK Ceilings
- 3mm Rule for DIYers: Hide a Wall and Ceiling Gap, When to Call a Pro
- Match Georgian Cornices: 75–125mm Sizing and UK Installer Tips
- 24 Hour Acclimatisation: Exterior Mouldings Installation for Installers
