

Home Decor
Installer Tips: Three Checks for Buying LED Coving Drivers
Oct
Before you buy, check three things: the output voltage matches your strip, the wattage has that margin, and the driver supports dimming if you want it. Get those right and the rest of the installation falls into place.
TL;DR:
- For flexible coving strips, choose a constant voltage SELV driver at the strip’s exact 12 V or 24 V rating; constant current suits rigid modules.
- Calculate load from watts per metre and total length, add about 5% for joints, then select a driver with 10% to 20% spare capacity.
- For runs longer than about 5 metres from one feed, use parallel feeds to limit far end dimming; increase cable gauge on longer driver connections.
- If dimming is planned, choose a driver that supports the intended control method, such as DALI, Zigbee, wall switch control, or PWM.
- Keep the driver ventilated and reachable after installation, and choose a higher IP rating for bathrooms, sink areas, or locations exposed to condensation.
Table of Contents
- 1. What an LED driver actually does in your coving
- 2. How to size and match a driver to your LED coving strip
- 3. Dimming and control compatibility: DALI, Zigbee, Push-DIM and PWM
- 4. Safety, standards and product warnings worth knowing
- 5. Practical installation and wiring tips for homeowners
- 6. Troubleshooting common driver and coving lighting problems
- 7. Buying checklist: what to confirm before you buy a driver for coving
- Carl’s installer perspective on choosing the right driver
- How we can help with your LED coving project
- FAQ
- Sources
1. What an LED driver actually does in your coving
A driver’s job is simple to describe but easy to underestimate. It takes mains alternating current and converts it into the low-voltage direct current that LED strips need, while protecting the strip from current spikes and, where fitted, handling dimming signals. Without the right driver, strips flicker, dim unevenly, or fail outright within months.
Because coving sits close to ceiling plaster and is usually touched only during cleaning or redecorating, most domestic installations use SELV (Separated Extra Low Voltage) drivers, which keep the output below 60 V. This is why 12 V and 24 V constant-voltage drivers dominate the coving market: they are safe to handle, widely stocked, and compatible with the flexible LED strips sold for cove lighting.
It helps to understand the difference between the two driver families. Constant-voltage drivers hold a fixed output voltage (commonly 24 V) and let the strip itself regulate current draw through its built-in resistors. This is the format used by almost every flexible LED strip sold for coving. Constant-current drivers, by contrast, deliver a fixed current regardless of voltage and are used mainly for rigid LED modules or architectural fittings rather than flexible strip. If you are fitting strip lighting into a coving channel, you want constant-voltage.
When comparing drivers, a few specifications are worth checking beyond voltage and wattage. The LEDVANCE DR-SUP range illustrates this well: it offers 24 V output across a range of wattages, with low ripple current and a long-life rating explicitly aimed at cove lighting applications. Low ripple matters more than many homeowners realise, since a driver with poor ripple control can introduce a faint flicker that shows up on camera footage or television screens even when it is invisible to the naked eye.
2. How to size and match a driver to your LED coving strip
Sizing a driver correctly is the single biggest factor in how long your coving lighting lasts. The process itself is straightforward arithmetic, but skipping it is the most common reason drivers fail early.
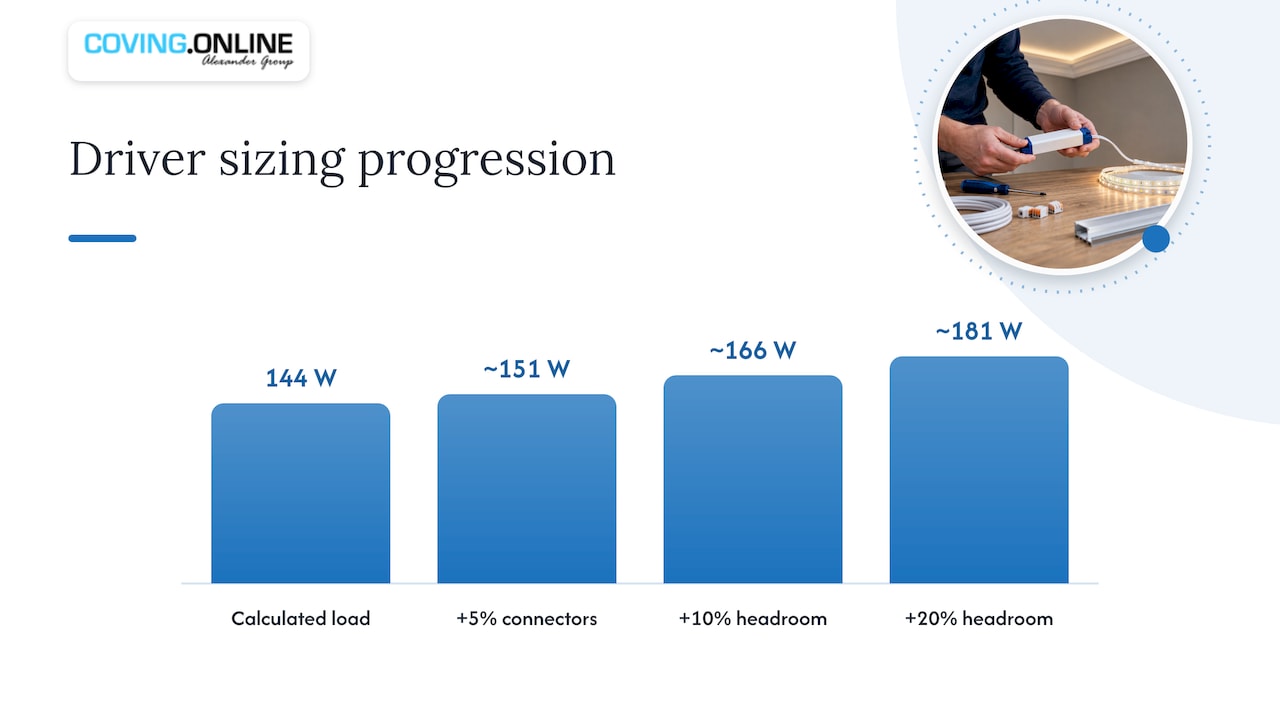
Start with your strip’s wattage per metre, printed on the packaging or datasheet, and multiply by the total run length. A strip rated at 14.4 W per metre run over 10 metres draws 144 W in total. Add a small allowance for connectors and any extra cable length beyond the strip itself, since joints introduce minor resistance losses.
Once you have total wattage, apply the headroom rule:
- Calculate total load. Multiply watts per metre by total strip length, then add roughly 5% for connectors and joints.
- Add 10 to 20% headroom. A 144 W load should sit on a driver rated between 160 W and 175 W, never one rated exactly at or below the calculated load.
- Check the driver’s nominal output voltage matches your strip exactly (24 V strip needs a 24 V driver, not 12 V or 36 V).
- Plan feed points for long runs. Runs beyond around 5 metres from a single feed often show dimming toward the far end; splitting the circuit into parallel feeds from the driver, rather than daisy-chaining one long cable, keeps brightness even.
First, drivers run cooler and last longer when they are not working at their absolute limit continuously. Second, LED strips draw a brief surge of current at switch-on, and a driver with no spare capacity can struggle with that inrush every time the circuit is energised. The LEDVANCE DR-V range offers 24 V variants across several wattages, including 30 W, 60 W, 100 W and 150 W, which makes it easier to find a size that lands in that 10 to 20% headroom zone rather than forcing an oversized or undersized compromise. For anyone fitting a media wall or TV surround alongside coving, the wiring schematics on this guide to media wall lighting circuits show how feed points and parallel runs are commonly laid out in practice, which translates well to longer coving runs too.
3. Dimming and control compatibility: DALI, Zigbee, Push-DIM and PWM
If you want your coving lighting to dim, or to sit inside a wider smart-home setup, the driver has to support that control method from the outset. Retrofitting dimming onto a basic on/off driver is not possible, so this decision needs to happen before you order.
- DALI-2 is the standard protocol used in professional and increasingly domestic dimming systems, offering precise, addressable control and compatibility with a wide range of smart controllers.
- Zigbee-enabled drivers connect directly into mesh smart-home networks without a separate dimming module, which suits homeowners already using Zigbee-based lighting elsewhere in the house.
- Push-DIM drivers are dimmed using a standard wall switch pressed and held, offering simple manual control without any app or hub.
- PWM (pulse-width modulation) is built into many constant-voltage drivers and offers smooth dimming when paired with a compatible controller, though it needs a PWM-capable output specifically, not every constant-voltage driver supports it.
The LEDVANCE DR DALI-SUP range is certified for DALI dimming and documents its technical dimming range clearly, while the Zigbee-enabled DR ZIGBEE NF P model offers a compact driver built specifically for direct mesh network control without an external gateway.
When planning a gateway or controller, keep cable runs between driver and controller within the manufacturer’s stated maximum, since exceeding it can cause signal dropout or unreliable dimming response. And if the coving sits near a television, camera setup, or home cinema screen, choosing a driver with documented low ripple current is worth the small extra cost: viewers notice flicker in recorded or streamed footage long before they notice it by eye.
4. Safety, standards and product warnings worth knowing
Driver safety is governed by IEC 61347-2-13, the current standard covering electronic controlgear for LED light sources, including marking and rated output requirements. A driver that complies with this standard will carry clear markings for output voltage, wattage and SELV status, and buying from manufacturers who reference it directly is a reliable shortcut to avoiding substandard products.
Electrical Safety First has issued recall and safety notices covering consumer LED strip kits where the supplied AC adaptor failed basic safety tests, including inadequate terminal attachments and non-compliant plug fittings. These cases tend to involve unbranded adaptors bundled cheaply with strip kits rather than dedicated lighting drivers from established manufacturers, which is exactly why buying the driver and strip as matched, branded components is worth the extra care.
For indoor coving, IP20 is the typical and perfectly adequate rating, since the driver sits inside dry, enclosed coving away from moisture. Bathrooms, kitchens near sinks, or any installation exposed to condensation call for a higher IP rating instead. And if you are converting an existing fitting or bypassing a driver’s built-in protection circuitry to save space, that work should go to a competent person: modifying controlgear is one of the few places where a confident DIYer can introduce a genuine electrical hazard without realising it.
5. Practical installation and wiring tips for homeowners
Good driver installation is less about electrical theory and more about discipline: ventilation, correct cable sizing, and testing before you commit to final fixing.
- Keep the driver ventilated. Drivers have a rated case temperature (Tc) and will shorten their own lifespan if boxed into a sealed, insulated coving cavity with no airflow.
- Use the correct conductor size for the run length. Thin bell wire works for short runs but causes voltage drop over several metres; step up to a heavier gauge for anything beyond a couple of metres from the driver.
- Maintain polarity throughout. Reversed polarity on a constant-voltage run will not damage most LED strips but will stop sections lighting, which wastes time tracing later.
- Secure every joint with proper connectors and strain relief, rather than relying on twisted wire and tape, since loose connections are the single most common cause of intermittent flicker.
- Test the full run before final fixing. Power up every strip section while the coving is still accessible, not after it is glued and painted.
Pro Tip: Run your full test with the driver at its final mounting position and orientation, not on the bench, since heat buildup and voltage drop both behave differently once the driver is tucked into its final space.
In our experience, the single biggest DIY mistake is mounting the driver somewhere it can never be reached again, such as behind a fully glued coving run with no access panel. We’ve found that leaving even a small discreet access point near the driver saves considerable grief if a dimmer module or driver ever needs replacing years later.
6. Troubleshooting common driver and coving lighting problems
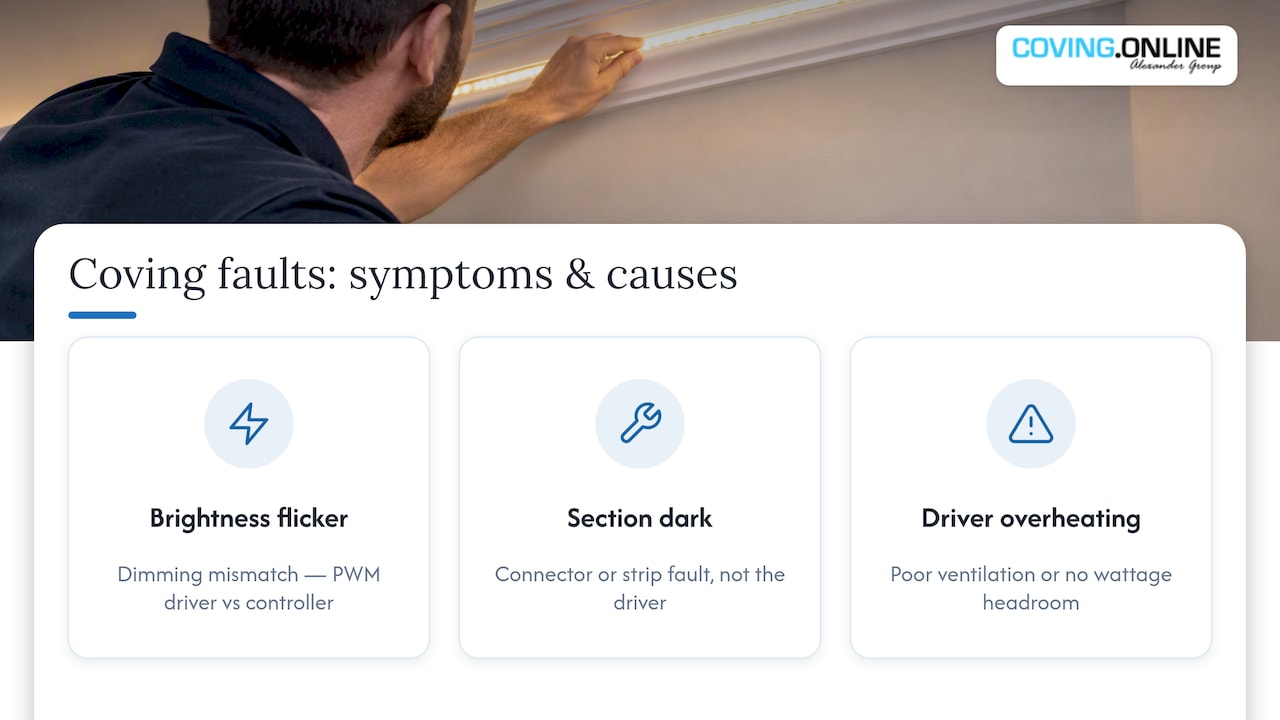
Most coving lighting faults trace back to one of three causes: the driver, the strip, or a loose connector, and the symptoms usually point you in the right direction.
Flicker that appears only at certain brightness levels usually points to a dimming mismatch, such as a PWM driver paired with an incompatible controller, rather than driver failure itself. A section of strip that stays completely dark while the rest works normally is almost always a connector or strip fault, not the driver, since the driver feeds the whole circuit. A driver that switches off after a few minutes of use, or feels hot to the touch, is very likely overheating due to poor ventilation or running close to its maximum rated wattage with no headroom.
Before assuming the driver has failed, switch off the circuit at the isolator, inspect visually for scorch marks or swollen casing, and if you have a multimeter, check the output voltage matches the rated figure with the strip disconnected. If the driver shows no output at all with mains confirmed present, replacement is usually the answer. If live testing, rewiring a mains-connected driver, or integrating a dimmer into an existing smart-home system feels beyond your confidence, that is the point to call a qualified electrician rather than guess further.
7. Buying checklist: what to confirm before you buy a driver for coving
Before ordering, run through this short list so you are not caught out after the coving is already fixed in place.
- Confirm the driver’s output voltage matches your LED strip exactly, whether that is 12 V or 24 V.
- Calculate total strip wattage and choose a driver with 10 to 20% headroom above it.
- Check for SELV marking, an IP rating suited to the room, and a Tc rating appropriate for an enclosed coving cavity.
- Confirm dimming interface compatibility (DALI, Zigbee, Push-DIM or PWM) if you plan to dim the lighting.
- Avoid unbranded adaptors with no visible BS, UKCA or CE marking, and favour recognised lighting manufacturers with published datasheets.
- Check the warranty length, since a driver backed by several years’ guarantee usually signals the manufacturer expects genuine longevity from it.
Carl’s installer perspective on choosing the right driver
In our experience, under-sizing the driver causes the majority of early failures we see on coving jobs, far more than faulty strips or poor workmanship. A driver running flat out with no headroom ages fast, especially in a warm, enclosed coving channel. Modest headroom and splitting long runs into parallel feeds solve most of the problems before they start.
Where we do recommend bringing in a professional is anything involving hidden, inaccessible drivers or layered control setups mixing DALI, Zigbee and manual dimmers in one room. Getting that wrong means chasing faults through plaster later. We supply LED-ready mouldings matched with correctly specified drivers and can arrange a qualified installer where the job calls for one.
— Carl
How we can help with your LED coving project
We supply LED coving kits from the Orac Decor and NOËL & MARQUET ranges, paired with drivers sized correctly for the strip length and wattage you need, so you are not left guessing at compatibility between separately bought components. For anyone who would rather not handle wiring at all, we can arrange professional fitting through our Installation service and the Elite Decor UK installer network, covering everything from the coving profile itself through to the driver and control setup.

- Browse our LED Coving range for prewired kits and compatible driver options.
- Request bespoke advice on driver sizing or dimming compatibility before you order.
- Arrange a full supply-and-fit service through Installation if you would rather leave the wiring to a qualified installer.
- Pick up adhesives and fixings for the rest of the job from our shop.
If you are planning the wider project rather than just the lighting, our guide to typical fitted LED coving costs is a useful next read before you order.
FAQ
How do I know which LED driver I need?
Add dimming compatibility (DALI, Zigbee, Push-DIM or PWM) to your checklist only if you plan to dim the lighting.
Can you run LED coving strip without a driver?
No, flexible LED coving strips need a driver to step mains voltage down to the low-voltage DC they run on, typically 12 V or 24 V. Running strip directly from mains voltage will destroy it almost instantly.
What driver do I need for LED lights in coving?
Most coving installations use a constant-voltage SELV driver at 12 V or 24 V, since that matches how flexible LED strip is designed to be wired. Constant-current drivers are generally reserved for rigid LED modules rather than coving strip.
What causes LED driver failure?
The most common causes are under-sizing the driver relative to total strip wattage, poor ventilation causing overheating inside an enclosed coving cavity, and low-quality adaptors that fail basic safety and electrical strength tests, as documented in Electrical Safety First product recall notices. Choosing a reputable driver with proper headroom and ventilation avoids most of these failures.
What is a good lifespan for an LED coving driver?
Lifespan varies by manufacturer and model, but drivers built for long-life operation, such as the LEDVANCE DR-SUP range, are designed with extended guarantees reflecting that longevity claim. Correct sizing with headroom and good ventilation both have a direct effect on how long any driver actually lasts in service.
Sources
- IEC 61347-2-13:2024 | IEC
- LEDBLE 5 Metre LED lighting strip kit with AC adaptor model JCY-1220 Aspect Safety Notice | Electrical Safety First
Recommended
- LED Coving Cost UK: Typical Fitted Jobs £350–£700
- Trade Ready Commercial Coving: LED Ready and Wipe Clean Solutions
