

Home Decor
Wall Panelling Layout: How to Plan, Measure and Mark Out
Oct
A good wall panelling layout comes down to four decisions made before any moulding is cut: where the centre line sits, how tall the panelling runs, how wide each panel is, and how the pattern behaves around doors, windows and sockets. Get those right on paper and in pencil, and the fitting is the easy part. Get them wrong and no amount of careful painting will hide a thin sliver of a panel squeezed in beside a door frame.
This guide takes you through the process the way we would on a job: measure, calculate, choose your heights, adjust for obstacles, then mark out and check before you fix anything.
TL;DR
- Measure the wall at floor, rail and ceiling height, then set out from the centre line or a feature such as a chimney breast, not from a corner.
- Use the formula: panel width = (wall width − ((number of panels + 1) × gap width)) ÷ number of panels, and adjust the panel count until the widths feel comfortable.
- A rail at roughly 900 to 1,100 mm suits many halls and dining rooms; three-quarter height suits taller rooms and bedrooms with a high headboard.
- Check sockets, switches, radiators and pipes first, and aim to have them sit inside a panel rather than behind a vertical stile.
- Draw every line in pencil, step back, and review before you cut or glue anything.
Table of Contents
- Why the layout matters more than the moulding
- Step 1: Measure the wall properly
- Step 2: Choose your panelling height
- Step 3: Pick the pattern that suits the wall
- Step 4: Calculate panel widths and spacing
- Step 5: Set out from the centre, not the corner
- Step 6: Adjust around doors, windows, sockets and corners
- Step 7: Mark out the layout and review it
- Carl’s Installer Tip
- Before you fix anything
- Our perspective on panelling layouts
- Choosing mouldings for your layout
- FAQ
- Sources
Why the layout matters more than the moulding
Most panelling that looks wrong is not wrong because of the profile. It looks wrong because the proportions are off: boxes of different widths on the same wall, a narrow strip left beside a door, or a top rail that cuts across a window sill at an awkward point.
Panelling works by introducing rhythm to a wall. Repeated, evenly spaced frames tell the eye the wall has been designed. The moment that rhythm is broken by an arbitrary leftover, the effect is lost. That is why the planning stage deserves more time than the fixing stage.
If you are still deciding what style of panelling you want, our guide to what wall panelling is covers the main types. If you have settled on a style, read on.
Step 1: Measure the wall properly
Measure the width of the wall in three places: at the floor, at the height where the top rail will sit, and at the ceiling. Older walls can taper, and a wall that reads as 3,600 mm at skirting level may be a few millimetres different higher up, according to guidance on UK panelling measurements. Those few millimetres are enough to make a run of panels drift out of line if you only measured once.
Write down:
- Wall width at three heights
- Floor to ceiling height at both ends and in the middle
- Position and size of doors, windows, alcoves and chimney breasts
- Position of sockets, switches, light fittings, radiators and thermostats
- Skirting board height, and whether you plan to keep it, replace it or fit new skirting first
If the floor or ceiling is not level, do not trust it as your reference. Use a spirit level or laser line to establish a true horizontal for the top and bottom rails, and let the gaps against the ceiling or floor take up the difference. Our article on ceiling mouldings for uneven walls explains how we deal with this in older properties.
Step 2: Choose your panelling height
Height is the first visual decision, and it changes how the whole room feels.
| Height | Typical measurement | Best for |
|---|---|---|
| Dado height | Rail at about 900 to 1,100 mm | Halls, dining rooms, many bedrooms, traditional homes |
| Three-quarter | About 1,500 to 1,800 mm | Taller rooms, or bedrooms with a high headboard |
| Full height | Floor to ceiling (or to a picture rail or coving) | Feature walls, modern rooms, rooms with good ceiling height |
The first two ranges come from UK panelling layout guidance, and they match what we see on real jobs. They are starting points, not rules. Where you can, align the top rail with something already in the room: a window sill, the height of a door’s top panel, or a dado line that already exists. A rail that lines up with a feature looks intentional; one that sits a few centimetres above or below looks like a mistake.
In a narrow hallway, a lower rail keeps the walls from feeling closed in, while taller panelling can make a small room feel more enclosed. We look at the hallway case in detail in wall panelling for hallways.
Step 3: Pick the pattern that suits the wall
The style you choose decides how the layout is calculated.
Shaker or box panelling
A grid of rectangles or squares framed by flat mouldings. The most forgiving style for beginners, and the one most readers searching for a layout are working on. Keep outer margins consistent, use fewer, larger panels on a narrow wall, and avoid tiny leftover boxes beside a door. For Shaker battens, start with panels roughly 400 to 800 mm wide and adjust for openings and wall scale, according to the same layout guide.
Georgian or traditional rectangles
Tall, narrower rectangles, often with a decorative profile, suit high-ceilinged reception rooms. The layout should respect the proportions of the room and, where possible, line up rail heights with door and window details rather than choosing arbitrary midpoints.
Slat and fluted panels
These run vertically and are usually fixed edge to edge, so the calculation is about the number of slats and the final cut width rather than gaps. Vertical lines draw the eye upwards, which helps in a room that feels low. Our 3D wall panels range covers sculpted and fluted designs that are fitted in this way.
Step 4: Calculate panel widths and spacing
For box panelling, the arithmetic is simple. The formula, as set out in this spacing guide, is:
panel width = (wall width − ((number of panels + 1) × gap width)) ÷ number of panels
The “+ 1” matters. With five panels you have six gaps: one at each end and one between each pair of panels. Forgetting the outer gaps is the most common slip.
Worked example: a 3,600 mm wall
Say you want five panels with 70 mm gaps (the width of the vertical stile, and also the margin at each end).
- Gaps: (5 + 1) × 70 = 420 mm
- Left for panels: 3,600 − 420 = 3,180 mm
- Each panel: 3,180 ÷ 5 = 636 mm
Six panels would give (3,600 − 490) ÷ 6 = 518 mm, and four would give (3,600 − 350) ÷ 4 = 812 mm. Five at 636 mm sits comfortably inside the 400 to 800 mm range, so five is your layout.
Worked example: a narrow 2,400 mm wall
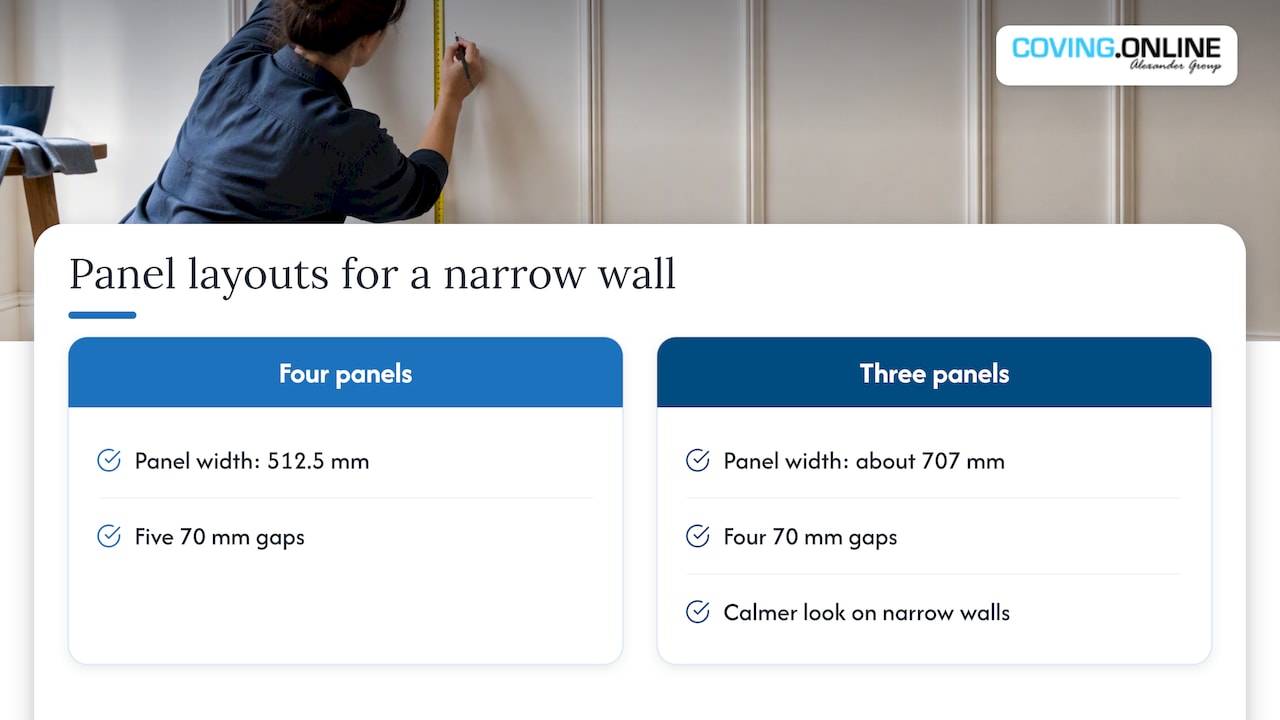
With 70 mm gaps, four panels gives (2,400 − 350) ÷ 4 = 512.5 mm. Three panels gives (2,400 − 280) ÷ 3, about 707 mm. Either works. We would usually pick the wider three-panel version on a narrow wall, because fewer, larger panels read as calmer.
If the answer is an awkward decimal, change the gap width slightly or change the panel count. A gap that is 5 mm wider or narrower is invisible to the eye; a panel that is 5 mm different from its neighbour is not. For more on spacing logic, including a 100 mm gap example, see our article on panel mould spacing.
Vertical spacing
Apply the same formula to the height. Decide whether the bottom panel starts at the top of the skirting or a set distance above it, and whether the top rail sits flush under the coving or a little below. A common arrangement is a slightly deeper bottom margin than top margin, so the panels appear to sit on the skirting rather than float. Whatever you choose, keep top and side margins equal, and keep the same gap between rows.
Step 5: Set out from the centre, not the corner
This is the habit that separates a professional layout from an amateur one. Start at the centre line of the wall, or at a feature such as a chimney breast, and work outwards, as the spacing guide recommends. Let the corners take any difference. If the wall is not perfectly square, a slightly narrower end panel in a corner is far less noticeable than an off-centre pattern across the main wall.
On a wall with a window or door in the middle, centre the layout on the opening, not the wall. On a bedroom wall, centre it on the bed. The rule is that the pattern should be symmetrical around whatever the eye goes to first.
Step 6: Adjust around doors, windows, sockets and corners
This is where most layouts need a compromise.
Doors and windows. Aim for the panel nearest an opening to be the same width as the others, or at least not much narrower. Avoid a thin box beside a door frame. If the maths leaves one, change the panel count or gap width across the whole wall rather than trimming one panel.
Sockets and switches. Check their positions during planning, and adjust the panel count so they sit cleanly inside a panel rather than being clipped by a stile, as the spacing guide advises. Government guidance for new dwellings places wall-mounted sockets and switches between 450 mm and 1,200 mm above finished floor level (this is English guidance), which is exactly the height range where a dado-height or three-quarter panelling grid will cross them. Expect a conflict and plan for it. If a socket has to move or be fitted with a deeper box to sit flush with the new surface, ask a registered electrician; do not alter wiring yourself.
Radiators and pipes. Note radiators and valves, and keep service access clear. Locate pipes and cables before drilling or using any fixings, and check bedside sockets and reading lights before you commit.
Internal and external corners. Decide whether the panel pattern wraps the corner or stops at it. Wrapping looks seamless but needs precise mitres; stopping gives a clean break but means the end margin must match the others.
Step 7: Mark out the layout and review it
Once the numbers work, transfer them to the wall.
- Draw a level line at the height of the top rail and another at the bottom rail, using a spirit level or laser.
- Mark the centre line, then mark the panel edges outwards from it, using your calculated widths.
- Mark the position of every vertical frame in pencil, and mark the sockets, switches and pipes you must avoid.
- Step back to the other side of the room and look at it. Change anything that feels heavy or cramped.
Pencil is deliberate. Changing a pencil line costs nothing, while changing a glued moulding costs time and material, a point the spacing guide makes too. The same transfer-and-check habit applies to a freshly prepped wall: a wall prep checklist is worth running through before any lines go on, so that dust and damp patches do not interfere with adhesive or paint later.
Tools you will need
- Tape measure and a long straight edge
- Spirit level or laser line
- Sharp pencil and a calculator
- Mitre saw or mitre box and fine-toothed saw
- Stud and pipe detector
- Adhesive and a caulk gun, plus filler and decorators’ caulk for finishing
Carl’s Installer Tip
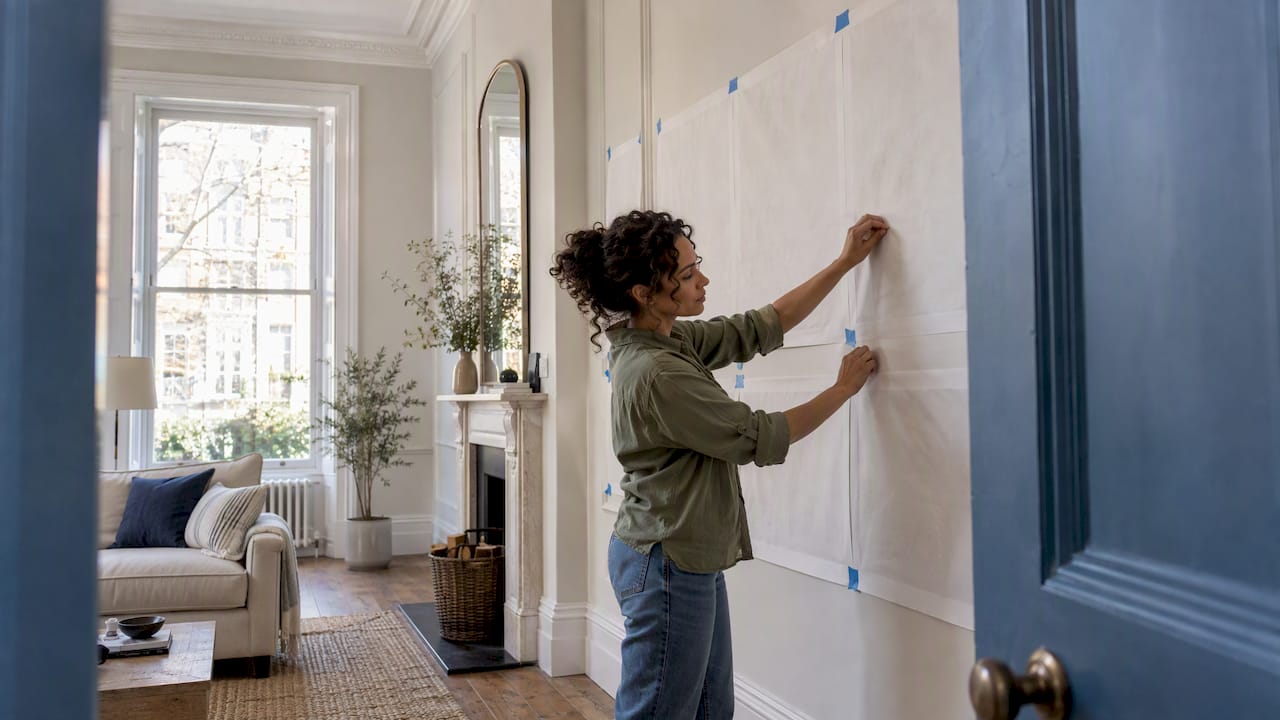
In our experience, the single most common mistake is setting out from the left corner because it feels natural. The result is a run of identical panels and one odd one at the far end, usually next to a door. We’ve found it is far quicker to draw the whole grid on a roll of lining paper first, tape it to the wall, and look at it from the doorway before touching the real wall. Move the paper a few millimetres, change the gap, or drop a panel until the margins feel even, then copy the marks across. It takes ten minutes and has saved us many hours of rework.
A second tip: dry-fit the first and last mouldings of each row before glue goes anywhere. Corners are rarely square, and you will want to know before you commit.
Before you fix anything
Once the layout is marked, check the wall itself. Sand it smooth, wipe off the dust and let it dry. Use a spirit level to confirm the design before attaching the panels with adhesive, a sequence described in Ronseal’s panelling guide. The same guide suggests applying adhesive to MDF about 10 cm from the edges, with no more than 30 cm between blobs, which keeps the moulding flat.
MDF is a sensible choice where there are many panels, because solid timber can move depending on how the home is heated, according to La Redoute’s expert panelling guide. Polyurethane mouldings, which we supply from Orac Decor and NOËL & MARQUET, are also stable and are lightweight to handle. If you will be painting MDF mouldings, good priming makes the finish last, and this MDF trim painting guide covers preparation, primer and finishing.
For the fixing itself, follow our step-by-step article on how to install wall panelling.
Our perspective on panelling layouts
We supply and arrange the installation of Orac Decor and NOËL & MARQUET mouldings, so we see both sides of a project: the customer choosing a profile and the installer standing in front of a wall that is not quite square. What we have learned is that the profile you choose matters less than people think, and the layout matters more than they expect.
That is why we encourage customers to plan before they order. Know your wall width, your rail height and your panel count, and the quantity of moulding follows from the drawing rather than from guesswork. It also means fewer returns and less waste.
We also think a restrained layout usually beats an ambitious one. Fewer, larger panels on a small wall, consistent margins, and a rail height tied to something already in the room will outlast fashion. If you are unsure, send us your measurements and we will talk it through, or one of our installers from the Elite Decor UK network can look at the wall with you.
— Carl
Choosing mouldings for your layout
Once you have your layout, the shopping list is straightforward: a flat or lightly profiled panel moulding for the frames, a top rail, skirting, adhesive, and perhaps coving or a ceiling rose to finish the room. You can browse our panelling range, match it with skirting and cornice and coving, and pick up adhesives and accessories in one order. If you would rather not do the fitting yourself, we can arrange professional installation across the UK through our installer network.
For wider inspiration on styles, see our guides to architectural moulding styles and decorative mouldings for walls.
FAQ
What is the best spacing for wall panelling?
There is no single figure, because it depends on wall width. For box panelling, work out the gap you like (many people choose between 50 and 100 mm), then use the formula to find the panel width. If the panels come out roughly between 400 and 800 mm wide, you are in a comfortable range. Adjust the panel count until the numbers are neat.
Where should I start when setting out panelling?
Start from the centre line of the wall, or from a feature such as a chimney breast or a window, and work outwards. Let the corners absorb any difference. Starting from a corner usually leaves a narrow or oversized panel at the other end.
How high should wall panelling go?
For many halls, dining rooms and bedrooms, a top rail at roughly 900 to 1,100 mm works well. Three-quarter height, around 1,500 to 1,800 mm, can suit taller rooms. Full height suits feature walls. Line the rail up with a window sill or other detail where you can.
How do I handle sockets and switches in panelling?
Mark them on the wall before you finalise the layout and aim to have each one sit inside a panel, not behind a stile. If a socket must be moved or re-boxed to sit flush, use a registered electrician. Locate pipes and cables before drilling.
Sources
- Wall Panelling Ideas UK: Styles, Measurements, Materials
- How to Calculate Wall Panelling Spacing (mm Guide)
- Electrical safety: Dwellings, Approved Document P (2013)
- How to panel a wall, Ronseal
- How To Panel a Wall, an expert guide, La Redoute
Recommended
- Panel Mould Spacing: Formula, 100mm Example and UK Installer Tips
- How to Install Wall Panelling for a Premium Finish
- Wall Panelling for Hallway Ideas That Work
- Don’t Skip Primer: Panelling Paint Tips from UK Mouldings Specialist
