

Home Decor
50–100mm Lip, 40–75mm Setback: Smart Cove Lighting for Homeowners
Sep
Smart cove lighting is concealed LED strip lighting, controlled through an app or voice assistant, that washes a ceiling or wall with indirect light. Get the strip right and choose a dimmable smart driver compatible with Casambi or Zigbee, and you’ll have a smooth, dot-free glow with energy-efficient running costs. Get the concealment detail wrong, and every hour of daylight will show you the mistake.
TL;DR:
- Proper sightline testing from all room angles is essential before fixing the cove to prevent visible hotspots, gaps, or scalloping issues.
- High-density COB strips with diffusers and a minimum CRI of Ra90 produce the most seamless, premium finish in indirect lighting applications.
- Building continuous runs and confirming driver wattage and compatibility before installation reduces flicker, color shift, and premature failure risks.
- Casambi controllers suit small, retrofit projects, while Zigbee, Wi-Fi, or DALI protocols are better for integrated or commercial smart home setups.
- Cost in the UK typically ranges from £350 to £700 for a fitted LED cove, depending on room size, strip density, and components chosen.
Table of Contents
- What is cove lighting and where does it work best?
- What are the benefits of smart, energy-efficient LED cove lighting?
- How do lip height, setback and gap size affect the result?
- Which LED strip and driver specification gives the best finish?
- How do Casambi, Zigbee and other smart controls compare?
- What should you check before buying strips, profiles or drivers?
- What installation mistakes cause the most visible problems?
- When is a smart system worth it, and when is simple enough?
- Get your smart cove lighting project specified and fitted
- Sources
- FAQ
What is cove lighting and where does it work best?
A cove is an architectural pocket that hides a light source so you see the glow it throws onto a ceiling or wall, not the fitting itself. That’s the whole principle behind cove lighting: concealment first, illumination second. Done well, it reads as architecture rather than a light fixture bolted onto the room.
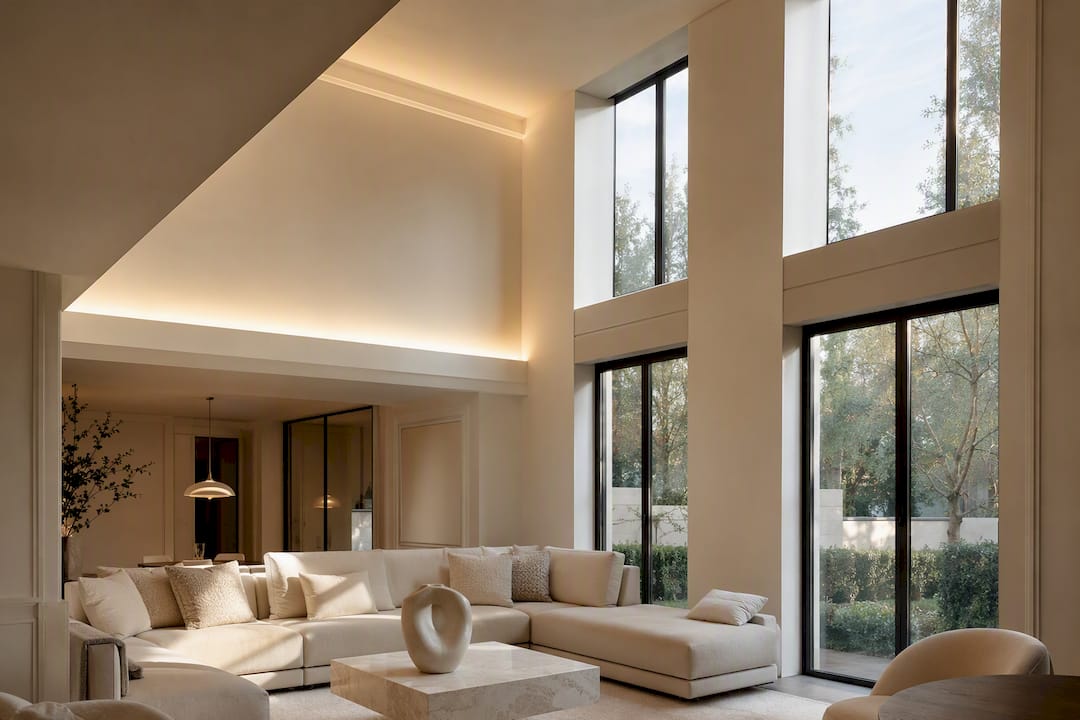
Cove lighting suits rooms where you want a soft ambient layer rather than direct illumination. It rarely works alone, though. Think of it as the background layer in a properly designed room, one that needs task lighting over a worktop or desk, and accent lighting on artwork or shelving, to make the space genuinely functional rather than merely atmospheric.
Common applications include:
- Living rooms, where a perimeter cove lifts ceiling height visually and softens evening lighting
- Bedrooms, where tunable white coves support a calmer wind-down routine
- TV walls, where indirect light reduces screen glare without competing with picture contrast
- Dining areas and feature ceilings, where a single-sided valance or tray cove adds architectural interest
- Kitchens with bulkheads, where cove detailing conceals structural elements while adding light
What are the benefits of smart, energy-efficient LED cove lighting?
LED strips run cooler and last considerably longer than the halogen or fluorescent options once used in cove details, which means fewer callouts to replace failed lamps hidden behind a ceiling detail you’d rather not open up again.
Smart control adds a second layer of value on top of that efficiency:
- Tunable white and RGB channels let you shift from crisp daylight to warm evening tones on the same strip
- Scheduling and scenes mean the cove dims automatically as the evening progresses, no manual switching required
- Voice control and remote app access suit rooms where a physical switch by the cove itself isn’t practical
- Grouping multiple coves into one scene keeps a multi-room scheme consistent rather than patchy
None of this matters if the colour rendering is poor. A high colour rendering index (CRI) still counts in indirect lighting, because the light bounces onto walls, ceilings and furnishings that people notice even when the source itself is hidden.
How do lip height, setback and gap size affect the result?
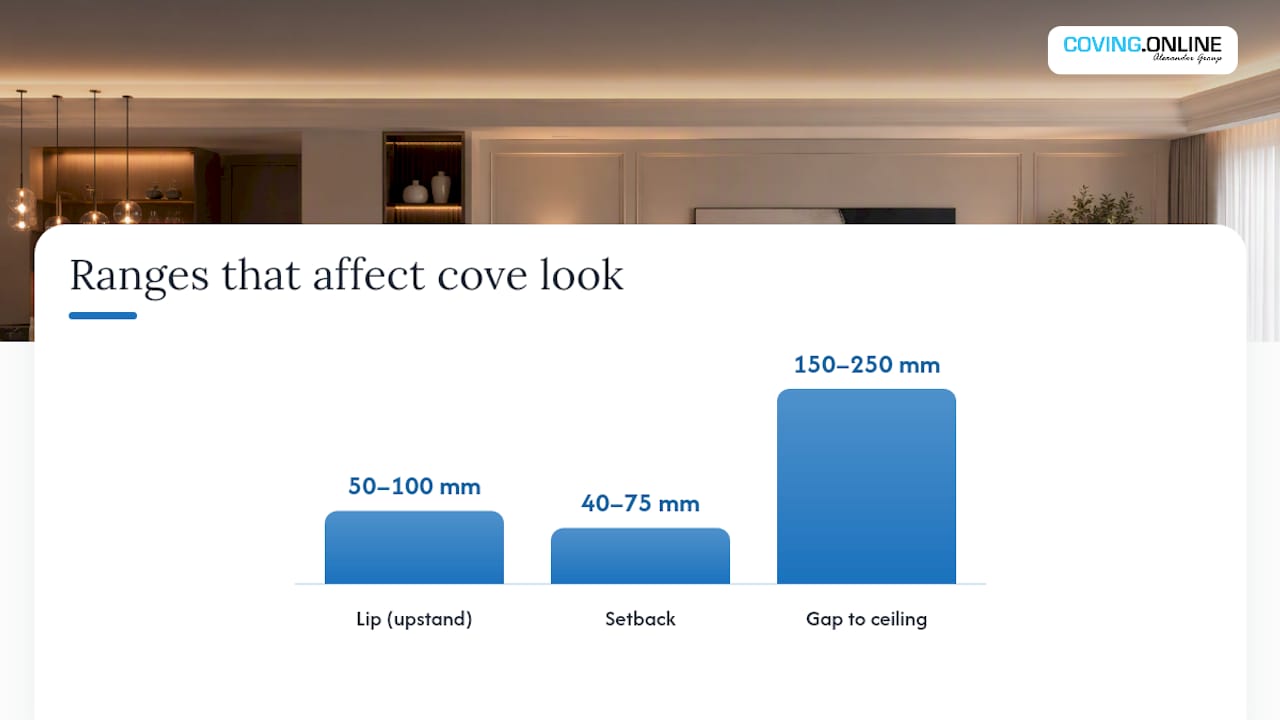
Three measurements decide whether a cove reads as a seamless glow or a visible strip of individual diodes: the lip or upstand height, the setback of the strip from the room, and the gap between the strip and the ceiling. Working ranges that installers rely on are a lip of roughly 50 to 100mm, a setback of 40 to 75mm, and a gap to the ceiling of 150 to 250mm. These figures interact rather than working in isolation: a shallow lip needs a deeper setback to compensate, and a tight gap to the ceiling risks scalloping if the strip isn’t dense enough.
Before you commit to a detail, check the sightlines. Sit in the lowest seat in the room and stand at the tallest likely viewing height, then look towards the cove from both positions. A cove that’s invisible from an armchair can be glaringly obvious from a standing position near a doorway.
- Mark the proposed lip height and setback on a test piece of profile
- Hold or temporarily fix it in place at the true ceiling height
- Check sightlines from every seating and standing position in the room
- Adjust setback or lip before committing to the joinery, not after
Choose aluminium profile channels rather than timber battens for the strip carrier. Aluminium keeps the run straight over long distances and pulls heat away from the LEDs, which extends their working life. Pair it with an opal or frosted diffuser to remove the dotted appearance that bare strip produces at close range, and plan your runs as continuous loops wherever possible. Gaps at corner joints and unlined coves both cause visible hotspots, so line the cove or continue the profile through the corner rather than butting two separate runs together.
Carl’s Installer Tip: In our experience, most cove problems trace back to a rushed sightline check. We’ve found that fixing a short offcut of profile in place and viewing it from every seat in the room, before you commit to plasterboard, saves a return visit almost every time.
Which LED strip and driver specification gives the best finish?
Strip choice comes down to density and diffusion, and this is where the biggest gap opens between a cove that looks premium and one that looks like an afterthought.
- COB (chip-on-board) strip is the most reliable route to a dotless finish, and it’s the preferred choice in shallow coves or wherever the strip sits close to a viewing angle
- High-density SMD strip works well in deeper coves where the diode line sits further from the eye, provided it’s paired with an opal diffuser
- CRI Ra90 is a sensible minimum for any cove that lights a living space; step up to Ra95 with a strong R9 value where timber floors, fabrics or skin tones matter to the room’s overall feel
- Voltage choice affects run length. 24V systems generally support longer continuous runs than 12V before voltage drop causes visible dimming at the far end of a strip
- Power injection or split feeds become necessary once a single run exceeds the manufacturer’s stated maximum length, which is a detail worth confirming before you order rather than after installation
- Driver sizing needs headroom. A driver running at its absolute maximum load is a common cause of flicker, colour shift, or premature failure, so specify a driver rated comfortably above your calculated wattage
How do Casambi, Zigbee and other smart controls compare?
The right control protocol depends on how the cove fits into the wider home, not just the room it sits in.
- Casambi uses Bluetooth mesh networking and needs no Wi-Fi hub, which makes it a genuinely convenient retrofit option for a single cove or a small group of rooms controlled from an app or voice assistant
- Zigbee typically needs a hub but plugs into a much wider smart home ecosystem, which suits homeowners already running Zigbee-based heating, security or other lighting
- Wi-Fi controllers connect directly to cloud services without extra hardware, though they depend more heavily on a stable internet connection for scene reliability
- DALI or DMX protocols appear on architectural specification projects and larger commercial jobs where a lighting designer needs precise, addressable control across many zones
Matched kits that bundle the strip, power supply, and a Casambi-enabled controller remove much of the compatibility guesswork that causes dimming faults on site. Whichever protocol you choose, confirm how the cove behaves if the network drops. Some systems hold their last setting locally; others need a live connection to respond to any command at all, which matters if you want the cove to work reliably every evening regardless of broadband outages.
What should you check before buying strips, profiles or drivers?
Order components in this sequence to avoid mismatched parts arriving on site:
- Confirm strip type and density (COB or high-density SMD) for your cove depth
- Specify CRI and colour temperature (CCT) before ordering, not after
- Calculate total wattage and confirm system voltage (12V or 24V)
- Choose a driver with dimming protocol matched to your controller
- Select an aluminium profile and diffuser suited to the lip and setback dimensions
- Confirm connector type and plan an access panel for the driver
- Decide on your controller or hub before first fix, not during snagging
Ask any supplier or installer directly whether the driver is confirmed compatible with your chosen dimmer or controller, what warranty covers strip and driver failure, the maximum continuous run length before power injection is needed, and what a typical fitted job costs in your region. For UK homeowners, fitted LED coving jobs commonly fall in a modest range rather than the price of a full room renovation, which is worth having in mind before you request quotes.
What installation mistakes cause the most visible problems?
Most cove failures show up after the ceiling closes, which is exactly when they’re hardest to fix. A short pre-close checklist prevents nearly all of them: run the sightline test from every seat and standing position, measure with the actual profile held in place rather than trusting drawings alone, and test the driver and dimmer together before anyone plasters over the access point.
- Visible strip: increase lip height or setback before final fixing
- Dotted appearance: swap to denser strip or COB, and add an opal diffuser
- Scalloping on the ceiling: increase the gap between strip and ceiling
- Hotspots at joints: line the cove or run the profile continuously through corners
- No driver access: plan a removable panel at first fix, not as an afterthought
Carl’s Installer Tip: We’ve found three checks catch almost every fault before it becomes permanent: view the run from the worst seat in the room, walk the full length of the cove checking for gaps or joints, and power up the driver and dimmer together before the ceiling closes. Skip any one of the three and you’re relying on luck.
When is a smart system worth it, and when is simple enough?
Smart controls earn their keep when a cove forms part of a multi-room scene, needs voice or app access, or has to integrate with an existing smart home. For a single mood-lighting run in a spare room, a simple dimmable driver often does the job just as well. Either way, spend your budget on profile, diffuser and strip quality first. A premium controller on a poorly concealed strip still looks like an afterthought.
— Carl
Get your smart cove lighting project specified and fitted
There are other routes to a lit cove, from generic online strip kits to hiring a local electrician who’s never fitted architectural profile before. Coving.Online takes a different approach: we supply the LED coving profiles and strip components from ranges including Orac Decor and NOËL & MARQUET, and where you want the job fitted rather than DIY, our Elite Decor UK installer network can arrange professional installation across the country.

Starting a project is straightforward. Measure your room and ceiling height, decide on lip height and setback using the sightline test covered above, then choose your profile and strip density before requesting a quote. If you’re weighing up proportions against your ceiling height, our coving size guide is worth a look before you order. Browse the Cornice & Coving range for matching profiles elsewhere in the room, or head straight to the LED coving category to request pricing and arrange a fitted installation.
Sources
Verify datasheets, maximum run lengths and driver compatibility against the exact product you buy, not a generic spec sheet, before ordering.
- Cove lighting — Wikipedia
- Cove & indirect lighting: design guide — Studio Matrx
- Cove lighting design: how to hide the source — Archlior
- Cove lighting kit — aspectLED
FAQ
What are the downsides of cove lighting?
Cove lighting needs careful dimensional planning; get the lip, setback or gap wrong and the strip becomes visible or the ceiling shows scalloping. It also can’t work alone as a light source, since it lacks the intensity for tasks like reading or cooking.
What is the best smart lighting system for a cove?
There’s no single best system for every home; Casambi suits retrofit projects needing app or voice control without a Wi-Fi hub, while Zigbee fits better where you already run a wider smart home ecosystem. Matched kits that bundle strip, driver and controller reduce the risk of compatibility issues on longer runs.
How much does cove lighting cost?
A typical fitted LED coving job in the UK commonly falls within a modest range of roughly £350 to £700, depending on room size and strip specification. Always ask installers for a quote based on your specific run length and chosen components.
What is the difference between LED strip and cove lighting?
LED strip is the light source; cove lighting is the architectural detail that conceals it and directs its output onto a ceiling or wall. You can’t have smart cove lighting without an LED strip, but a strip on its own isn’t cove lighting until it’s built into a concealed detail.
Do I need a professional to install smart cove lighting?
Straightforward single-room coves suit a confident DIYer, but multi-room smart integrations, longer runs needing power injection, or bespoke profile work benefit from professional fitting. Coving.Online’s Elite Decor UK network can arrange installation once you’ve chosen your profile and strip specification.
Recommended
