

Home Decor
10mm shadow gap skirting: specs and install tips for designers & trades

Sep
Shadow gap skirting is a recessed groove, typically 5 to 25mm deep, that runs along the base of a wall in place of a conventional skirting board, creating a clean shadow line rather than a visible trim. Designers, developers and homeowners renovating to a minimalist brief choose it because it makes walls appear to float above the floor, with no moulding to interrupt the plane. It suits new-build partitions and high-spec refurbishments far more readily than uneven period walls.
TL;DR:
- Shadow gap skirting exposes every imperfection, so precise wall build and profile installation are crucial for a clean, intentional look.
- Manufactured profiles, such as CNC-cut GRG or aluminium extrusions, ensure consistent shadow lines across multiple rooms, saving on-site time.
- Proper measurement of the shadow gap height relative to final floor finish is essential to maintain the intended subtle architectural detail.
- Two-piece profiles are preferable when flooring is installed after wall finishing, allowing removal and refitting without damage.
- Material choices impact durability and appearance, with aluminium suited for high-traffic areas and timber or MDF fitting better for domestic settings.
Table of Contents
- What is shadow gap skirting and why do designers use it?
- Types and materials: aluminium, MDF, GRG and integrated systems
- Design dimensions: gap height, groove depth and visible skirting height
- Manufactured profiles versus site-formed shadow gaps
- How do you install shadow gap skirting on a standard drywall build?
- Finishing and maintenance: painting, cleaning and repair options
- Where does shadow gap skirting work best, and what should you avoid?
- Coving.Online’s perspective on getting shadow gaps right
- Order profiles, get cutting help, and book installation
- Useful sources and further reading
What is shadow gap skirting and why do designers use it?
The appeal comes down to how light behaves at that junction. A traditional skirting board sits proud of the wall and catches light across its face. A shadow gap does the opposite: it recedes into darkness, so the eye reads a clean line rather than a moulded profile. A shadow gap is a narrow-recessed groove at the wall to floor junction that replaces a traditional skirting board and creates a clean, floating wall line, which is precisely why architects specify it on projects where the wall itself is meant to be the feature.
You’ll see it most often in:
- New-build apartments and developer show homes, where a consistent, repeatable detail across dozens of units matters
- Contemporary residential renovations, particularly open-plan kitchens and living spaces
- Boutique hotels and office fit-outs, where the detail reinforces a premium, considered finish
There’s a trade-off worth knowing before you commit to it. A shadow gap has nowhere to hide. Every dip in the plasterboard, every wobble in the groove line, sits at eye level under raking light. Where a chunky skirting board forgives a slightly uneven wall, a shadow gap exposes the workmanship behind it. That’s not a reason to avoid it. It’s a reason to plan the wall build and the profile choice properly from the outset.
Types and materials: aluminium, MDF, GRG and integrated systems
Material choice shapes both the look and the long-term performance of a shadow gap, and the right answer depends on where in the building you’re working.
- Aluminium profiles offer the strongest resistance to knocks and scuffs, which is why aluminium shadowline systems are frequently specified for high-traffic or commercial applications where impact resistance matters more than in a quiet bedroom. Anodised or powder-coated finishes also age well in busy hallways, communal corridors and kitchens.
- MDF and timber shadowline systems are machined as one-piece profiles, giving a flush, joinery-grade finish that suits domestic projects where a timber or painted finish is wanted throughout the house.
- GRG (glass reinforced gypsum) and pre-formed plaster profiles are CNC-cut for architectural accuracy, and manufactured GRG and CNC-cut profiles deliver repeatable, straight shadow lines and reduce site-forming errors compared with hand-formed methods, which matters enormously on projects with many identical rooms.
- Integrated one-piece systems combine skirting and reveal in a single moulded length, while two-piece systems separate the fixed profile from a removable lower reveal.
The one-piece versus two-piece decision often comes down to your flooring programme, not aesthetics. If flooring goes down after the walls are finished, a two-piece profile lets the installer lift the lower section, fit the floor, then click it back into place without damaging the edge.
Design dimensions: gap height, groove depth and visible skirting height
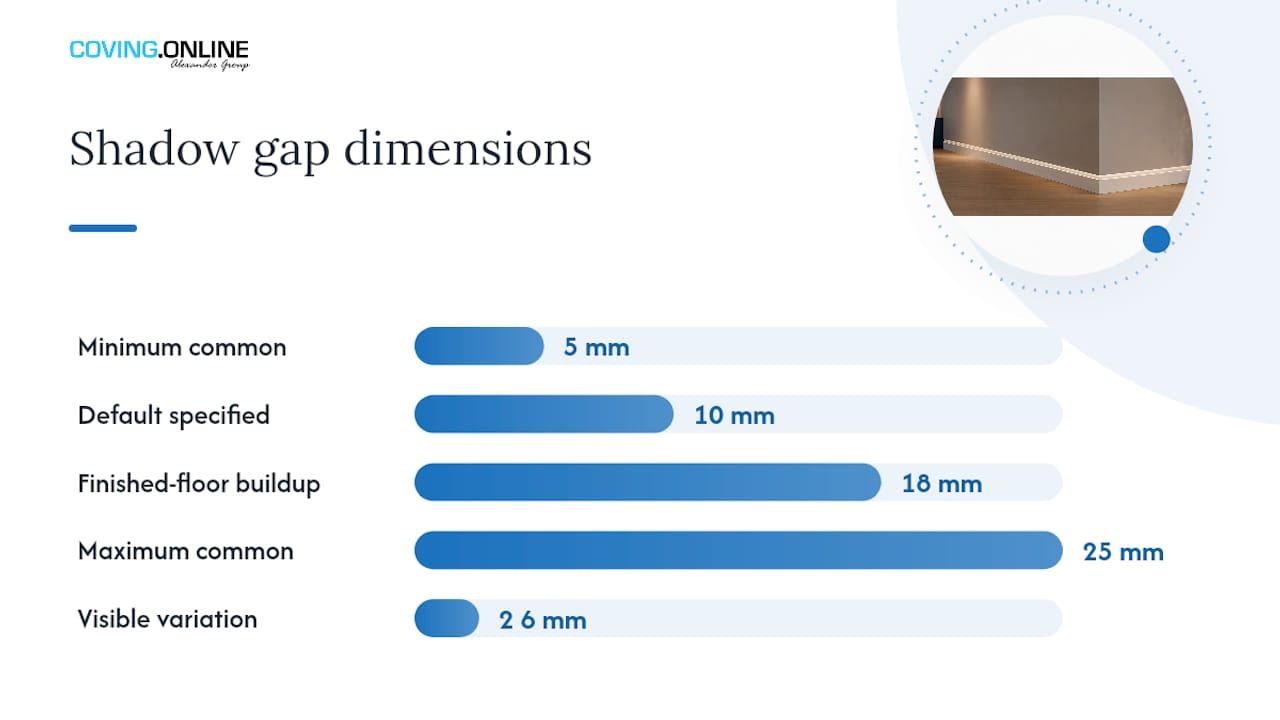
Get the numbers wrong and the whole detail looks accidental rather than intentional. Common shadow gap heights range from about 5mm up to 25mm, with 10mm frequently specified as a default for a subtle architectural line that reads clearly without dominating the room.
Measure the visible gap relative to the finished floor level, not the subfloor. This catches out more first-time specifiers than any other detail. If your final floor finish (tile, engineered timber, carpet with underlay) adds 18mm you haven’t allowed for, your crisp 10mm shadow line either disappears or doubles in size.
Tolerances matter more here than on almost any other joinery detail. A variation of just 2 to 3mm along a run is visible to the eye once light rakes across it, so specify the profile to suit your actual floor buildup, and always confirm final flooring thickness before the shadow gap profile goes in, not after.
Manufactured profiles versus site-formed shadow gaps
There are two fundamentally different ways to create a shadow gap, and the choice affects your budget, your programme, and how consistent the result looks across a whole property.
Manufactured profiles (CNC-cut GRG, aluminium extrusions, machined timber) are made off-site to exact tolerances. They install as a fixed component, so the groove is identical from room to room.
- Best for developments with repeated room layouts, where consistency across units matters
- Reduces on-site finishing time because the groove arrives already true
- Projects requiring the same detail across many rooms benefit most from factory-made profiles because they reduce variation and site rework
Site-formed methods, using a P50 metal angle or L-bead set into wet plaster, cost less in materials but demand a skilled plasterer. A common on-site method is to form the shadow gap with a P50 metal angle or L-bead during plastering, though this method can be slower and more prone to inconsistent grooves and cracking if the trade isn’t experienced with the detail.
As a rule of thumb: specify manufactured profiles on any project with more than a handful of rooms, tight tolerances, or a fast programme. Accept site-formed detailing only on small, single-room jobs where you have a plasterer you trust to hold a line by eye.
How do you install shadow gap skirting on a standard drywall build?
The sequence matters because each stage locks in tolerances the next stage can’t correct. Skip a step and you end up chasing an uneven line with filler, which never quite disappears under raking light.
- Fix the profile first. The shadow gap profile (aluminium, GRG or timber) is mechanically fixed to the stud or floor track before boarding goes up, setting the groove line from the start.
- Board to the profile. Plasterboard is cut and fixed up to the fitted edge of the profile, not the other way round.
- Tape and skim the joint. The junction between board and profile gets taped, then skimmed flush, so the wall face reads as continuous plaster right up to the groove.
- Allow proper drying time before moving to floor finishes. Rushing this stage is the single biggest cause of hairline cracking at the joint.
- Fit the floor finish. Where flooring is installed after skirting, a two-piece system allows the lower reveal to be removed, the flooring fitted, and the reveal refitted without marking the edge.
- Final touch-ups. Fill any fixing points, prime, and check the groove depth along the full run before decorating.
Corners and door reveals need extra thought at step one; profiles must be scribed or mitred before boarding starts, not adjusted afterwards.
Pro Tip: In our experience, the biggest single cause of a poor shadow gap is boarding before the profile is checked for level across the whole run. We’ve found that a five-minute laser-level check before board goes up saves hours of remedial skimming later, and it’s the one step trades are most tempted to skip when they’re under time pressure.

Finishing and maintenance: painting, cleaning and repair options
Getting the finish right protects the crispness that makes the whole detail worthwhile.
- Aluminium profiles generally arrive pre-finished (anodised or powder-coated) and rarely need painting, though a light wipe with a damp cloth keeps the groove free of dust build-up.
- MDF and timber shadowline profiles should be primed and painted to match the wall for a seamless read, using a paint suited to joinery rather than standard wall emulsion.
- GRG and plaster profiles take standard wall paint once sealed, and small chips can be filled with a fine plaster filler and re-primed.
- For scuffs and knocks on any material, touch up locally rather than repainting the whole run. It’s far quicker and avoids visible tone shifts along the line.
- Check the groove twice a year for dust build-up or hairline cracking at joints, particularly in new-build properties still settling.
Where does shadow gap skirting work best, and what should you avoid?
Shadow gaps suit contemporary and minimalist interiors best: open-plan living spaces, new-build apartments, and refurbishments where walls are already true and flat. Period properties with wavy plaster walls are a harder sell, since the detail has nowhere to hide the imperfections.
Common pitfalls to brief out before work starts:
- Uneven subfloors that throw off the visible gap height once flooring goes down
- Poor plasterboard runout, where the wall isn’t straight enough for the groove to read cleanly
- Moisture-prone rooms (bathrooms, utility spaces) where timber profiles are the wrong material choice
When briefing a supplier or installer, ask for the exact profile dimensions in writing, confirm the flooring buildup before the profile is ordered, and insist on a level check across the full run before boarding proceeds.
Coving.Online’s perspective on getting shadow gaps right
Shadow gap skirting rewards planning far more than it punishes improvisation, and that’s the biggest thing we’d want any homeowner or specifier to take from this. The detail looks deceptively simple on a drawing. On site, it’s one of the least forgiving junctions in the whole build, because it removes the moulding that normally hides a multitude of small sins.
Carl’s Installer Tip: We’ve found that the projects which go smoothly are the ones where the flooring decision is locked in before the shadow gap profile is ordered, not after. Get that sequence backwards and you’re either re-cutting a profile or living with a gap that’s the wrong depth.
Coving.Online works with architects and homeowners on exactly this kind of detail, from drawings through to cut-to-size profiles and, where needed, installation via our national network. Our range spans Orac Decor and NOËL & MARQUET, so there’s genuine choice across material and finish rather than a single fixed option.
— Carl
Order profiles, get cutting help, and book installation
Coving.Online is the practical route from drawing to finished shadow gap, without you having to source profiles, adhesives and an installer separately. Whether you need aluminium for a busy hallway, a machined timber system for a period-style renovation, or GRG for a repeatable apartment scheme, we hold the profile ranges from Orac Decor and NOËL & MARQUET to match most specifications.

Send us your drawings and room dimensions and we’ll help you specify the right gap height and material for your floor buildup, then supply cut lengths ready for your installer, or arrange fitting through our national installer network. If you’re detailing a room where carpet or another particular floor finish complicates the reveal, our guide to fitting skirting with carpet covers the sequencing in more depth. Browse the full range of decorative mouldings and skirting profiles and get in touch with your project details to get a quote or book your installation slot.
Useful sources and further reading
- Coving
- Coving
- Coving
- ExtensionKings: finished interiors and installation sequencing
- Intrim Shadowline SK800 profile specifications
