

Home Decor
Architrave Corner Blocks: Choosing, Sizing and Fitting

Nov
Architrave corner blocks are square decorative blocks, often called rosettes, that sit at the top corners of a door surround so the two architrave lengths butt into them instead of meeting at a mitred joint. Their partner at the bottom, the plinth block, takes the skirting. Used together they give a period look, hide awkward joints, and let you fit a door surround without a mitre saw. The one rule that matters is proportion: the block has to suit the architrave and skirting it joins.
This guide covers what the blocks do, how to size them, how to fit them and where skirting corner blocks fit in. It is written for homeowners, DIYers, decorators and specifiers alike.
TL;DR
- A corner block (rosette) replaces the mitre at the top corners of a door surround. A plinth block does the same job at the foot, where architrave meets skirting.
- Choose a block the same width as the architrave, or up to 5mm wider, and thick enough that the architrave and skirting both die into it.
- Blocks suit period and classically styled rooms best. Keep the whole trim scheme in proportion rather than mixing scales.
- Set out your margins first, mark round the block, cut the architrave to the pencil lines, then fix with adhesive and pins.
- For internal skirting corners you cope the joint, and for external corners you mitre. Blocks are not a cure for either.
Table of Contents
- What architrave corner blocks are and where they go
- Why use blocks instead of mitres
- Choosing blocks that suit your architrave and skirting
- How to fit architrave with corner blocks
- Where skirting corner blocks fit in
- Check before you buy
- Our approach to door surrounds
- Ready to specify your door surrounds?
- FAQ
- Sources
What architrave corner blocks are and where they go
Architrave is the moulding that frames a door or window opening and covers the gap between the wall finish and the door casing. The traditional way to join the head (the horizontal piece) to the legs (the verticals) is a 45-degree mitre. That joint looks very clean, but it needs accurate cutting and a wall and casing that are close to square.
A corner block removes that demand. The head and legs are cut square and butt into the block, so the only cuts you need are straight ones. Carpentry guidance describes them as a quick alternative to mitring that does not need an expensive mitre saw.
They are not only for doorways. The same blocks work as a feature on window surrounds, fireplace surrounds, and kitchen or study units, and they can go on before the skirting boards are fitted.
You will meet three terms, and they overlap:
- Corner block or rosette: the block at the top corners of a door or window surround.
- Plinth block: a taller block at the foot of the architrave. The skirting runs into its side and the architrave sits on top of it.
- Skirting corner block: in practice this usually means the plinth block, or a decorative block used where skirting meets a door surround. It is not a fitting that replaces a mitre on a room corner (more on that below).
Why use blocks instead of mitres
A mitre has one real advantage: no end grain shows, and the moulded profile runs round the corner as one continuous shape. The drawback is movement. Timber shrinks and swells across the grain as humidity changes, so a mitre can open over time, and DIY Data notes that in older properties the casing may not be square, so each angle has to be measured and cut individually.
Blocks sidestep that in three ways:
- Square cuts only. Every end is cut at 90 degrees, which is simple with a hand saw and a square.
- Tolerance for out-of-square openings. A small error at the corner is hidden by the block rather than shown in a gappy mitre.
- A recognisable look. The block gives a door surround a defined, framed appearance that suits Victorian, Edwardian and Georgian-style interiors.
If you prefer the unbroken profile of a mitre, that remains a perfectly good choice. If you are unsure which suits your hallway, look at the style of the house first, then decide.
Choosing blocks that suit your architrave and skirting
Match the scheme to the house
Proportion drives the choice more than the profile alone. Skirting, architrave and corner pieces should look as though they belong together, and mixing styles or scales undermines the effect.
For period homes, the guidance from Homebuilding is to echo what the period used. A professional carpenter quoted there says ogee or torus profiles around 150 to 200mm high suit Victorian hallways and living spaces, balancing tall ceilings and deep architraves. Edwardian interiors suit tall skirting with gentler curves and less detailing.
Blocks come into their own in those rooms. In a minimalist or contemporary scheme, traditional detailing can feel out of place, so a plain, square-edged architrave with mitred corners, or a flush finish, often sits better. Our guide to flush skirting boards covers that modern route, and our piece on choosing skirting boards for period homes goes deeper on the traditional one.
Get the dimensions right
Three measurements decide whether a block looks right:
- Width against the architrave. Buy blocks the same size as, or up to 5mm wider than, the architrave. Any narrower and the architrave overhangs the block at the sides.
- Thickness against the architrave. The block should stand slightly proud of the architrave, so the architrave runs into it cleanly and the profile finishes against a visible face.
- Height of the plinth block against the skirting. The plinth block should be taller than the skirting so the skirting dies into its side. If the skirting is thicker than the architrave, it stands proud where the two meet at the foot of the door. A plinth block thicker than both solves that.
For help with the sizes of the surround itself, see our door surround sizes guide, and for the skirting side, skirting profiles, types and heights. If you want a wider look at how to work out compatible dimensions across trim, profile sizes and how to choose is a handy comparison of how profile choices fit together.
Pick the material for the room
The usual choices are timber, MDF and polyurethane. Painted timber and MDF are traditional, but both react to moisture, and cut ends need sealing before paint. Polyurethane mouldings, which are the focus of our Orac Decor and NOËL & MARQUET ranges, are supplied ready to paint and fix with adhesive, which suits DIYers working without a bench or heavy tools. Our comparison of polyurethane versus timber mouldings sets out the choice in more detail.
Whichever you choose, keep the door surround, plinth blocks and skirting in one material family where you can, so paint takes evenly and the finish reads as one scheme.
How to fit architrave with corner blocks
The sequence below suits a standard internal door. You will need a pencil, a tape, a combination or try square, a fine-tooth saw, grab adhesive, PVA, 40mm pins or a second-fix nail gun, filler and decorator’s caulk.
1. Mark the margin
Architrave is normally set back from the inner edge of the casing by about 4 to 5mm, known as the margin or reveal. DIY Data explains that a very narrow margin can restrict hinge knuckles and striking plates, while a larger margin leaves less nailing area. Professional fitters often work to a consistent 5 to 6mm, marked with a combination square. Pick one and keep it identical on all three sides.
2. Position the corner blocks
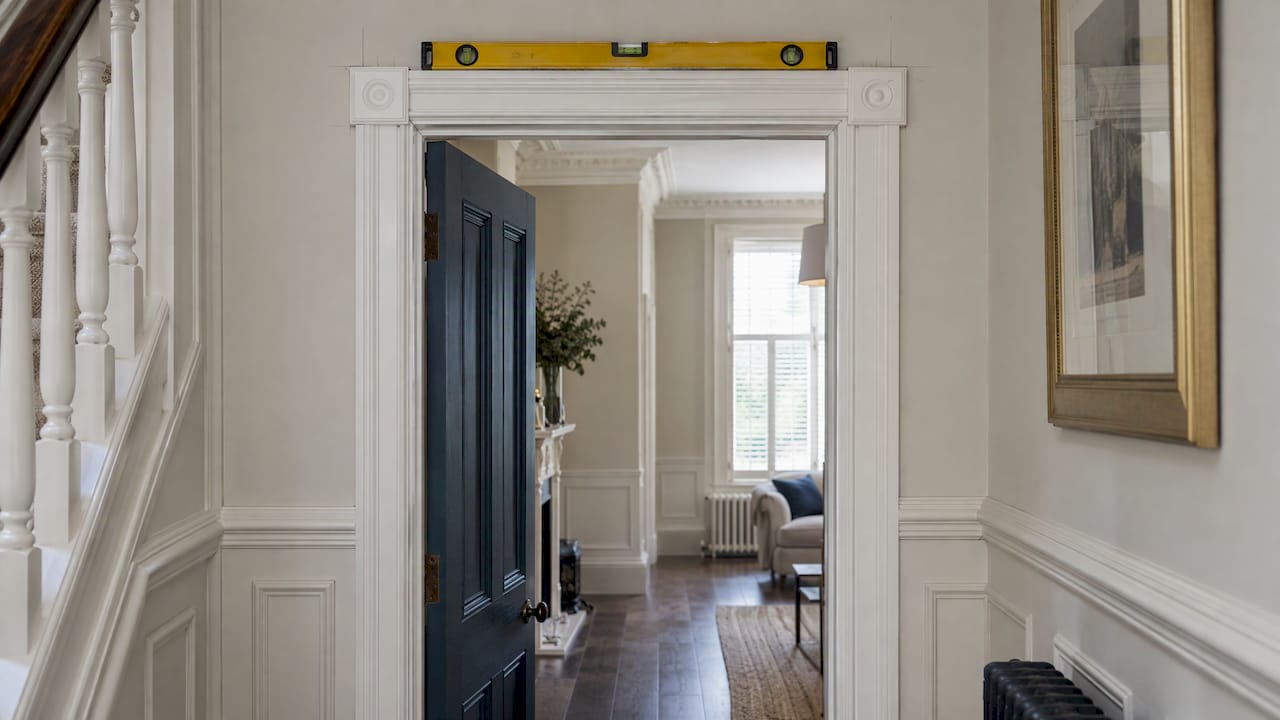
Set out the margin lines on the wall. Centre each corner block over the point where the margin lines cross, and draw round it in pencil. This is the step that decides the whole look, so check with a spirit level that the two top blocks sit level with one another.
3. Cut the architrave to the pencil lines
Measure the legs from the floor, or from the top of the plinth block, up to the underside of the corner block. Measure the head between the blocks. Cut square, and test-fit each piece dry before you glue anything.
4. Fix the blocks and architrave
Carpentry guidance recommends a gap-filling adhesive against the wall and PVA where the architrave butts into the block, with 40mm nails or a nail gun. Where you are fitting polyurethane, use an adhesive designed for it, and pin only as the product instructions allow. Our shop carries adhesives and door surrounds for this.
Pins spaced roughly every 400mm, aimed at the thicker parts of the profile, give a secure hold without splitting the thin edges.
5. Fill, caulk and paint
Fill pin holes with filler (30 to 60 minutes drying time for most), sand lightly, and run decorator’s caulk along the outer edges where the architrave meets the wall. Seal the joins, then paint the blocks and architrave in the same coat so the colour matches.
Carl’s Installer Tip
In our experience, the most common mistake is fitting the blocks before checking the floor. Plinth blocks sit on the finished floor level, so if carpet, tiles or a new floor are still to come, allow for it, or the blocks end up too tall or too short. We’ve found it saves time to cut one leg, offer it up to both the plinth and corner block, and use it as a template for the opposite side. Dry-fit everything before you glue, and wipe adhesive squeeze-out immediately with a damp cloth, because dried adhesive is hard to paint over cleanly.
Where skirting corner blocks fit in
The search term “skirting corner blocks” can mean two different things, so it helps to separate them.
Plinth blocks at the door. This is where skirting meets architrave. The skirting stops against the side of the block, which gives a tidy, deliberate junction rather than a skirting end that clashes with the architrave profile.

Room corners. Skirting on the internal corners of a room is not normally finished with a block. Internal corners should not be mitred, because walls are rarely exactly 90 degrees and wood movement opens the joint, according to BuildWiz. The better method is a scribed or coped joint. We explain it step by step in how to cope skirting joints for tight internal corners.
External corners take a 45-degree mitre on each board, bonded with grab adhesive and pins. See avoiding gappy external corners for the details.
For mitres, accuracy in marking is what counts. DIY Doctor advises measuring from the internal point where the joint changes direction and test-fitting the cuts before fixing. Back-cutting mitres by a degree or two helps the front edge close on walls that are out of square.
Check before you buy
A few quick checks avoid the usual returns and rework:
- Existing mouldings. If the house has original skirting and architrave, restore it where possible. Original profiles carry character that is hard to replicate, and if boards are beyond saving, skirting over skirting can protect old plaster.
- Skirting and architrave thickness. Compare them where they meet. If the skirting is thicker, you need a plinth block.
- Wall and casing squareness. Hold a square to the casing. A block hides a small error but cannot rescue a casing that is badly out.
- Ceiling height and door width. Tall ceilings carry bigger blocks and deeper architraves. A small hallway with a narrow door looks cluttered if the block is oversized.
- Room-to-room consistency. Use the same block style through a hallway and the rooms leading off it, so the doors read as a set.
Our approach to door surrounds
We think of trim as a system, not a set of separate parts. The architrave, the plinth block, the skirting and the coving all need to speak the same design language, and the room reads better when they do.
Our range is built around Orac Decor and NOËL & MARQUET polyurethane mouldings, which cover both traditional and contemporary profiles, so you can specify a matching door surround, skirting and ceiling detail from one place. That matters most when you are working through a whole hallway or a full renovation, where mismatched sizes are the most common cause of rework.
If you would rather not fit it yourself, we can coordinate the project from purchase through professional fitting, through our Elite Decor UK installer network.
Carl
Ready to specify your door surrounds?
We supply over 500 Orac Decor and NOËL & MARQUET products, including skirting, door surrounds and adhesives and a full range of cornice and coving to match. If you want the fitting done for you, we can arrange professional installation across the UK through our national installer network.
For a whole-room scheme, our guide to matching skirting and coving shows how to keep proportions consistent from floor to ceiling.
FAQ
What is the difference between a corner block and a plinth block?
A corner block, or rosette, sits at the top corners of a door or window surround. A plinth block sits at the bottom, where the architrave meets the skirting. The plinth block is normally taller and thicker so that the skirting runs into its side.
Do architrave corner blocks have to be wider than the architrave?
They should be the same width as the architrave or up to 5mm wider. A narrower block leaves the architrave overhanging at the sides, which looks like a mistake. A slightly wider block gives a neat, deliberate border.
Can I fit corner blocks without a mitre saw?
Yes. That is one of their main advantages. Every cut is square, so a hand saw and a try square are enough. The care goes into marking out the margins and getting the two top blocks level.
Can I use corner blocks on skirting at room corners?
Not as a rule. Internal corners are best coped, and external corners are mitred. Blocks belong at door and window surrounds, where the skirting meets the architrave.
Sources
- Architrave corner blocks installation
- How to match your skirting board to your interior style, Homebuilding
- Skirting Boards: Profiles, Heights, Materials, and How to Fit, BuildWiz UK
- Fitting architrave around doors, windows and loft hatches, DIY Data
- How to Fit Architrave Around a Door Frame, BookaBuilderUK
- Mitre Joints: How to make the Perfect Joint, DIY Doctor
Recommended
- Panel Moulding Corners: Blocks, Mitres and Neat Joins
- How to Cut Cornice Corners for a Clean Finish
- Avoid Gappy Corners: Trade Tips for DIY Skirting External Corners
- Preformed Coving Corners for Cleaner Finishes
