

Home Decor
3D Ceiling Panels: Choosing and Fitting Them Properly

Nov
3D ceiling panels are textured, sculpted tiles or boards that turn a flat ceiling into a feature. For a UK home, lightweight polyurethane panels are the easiest to handle overhead. They need a sound, clean, dry surface, a suitable adhesive, careful setting out and a patient, panel-by-panel approach. The same panels can usually go on walls too, with a few differences in how you plan and support them.
This guide covers what 3D ceiling panels are, how to choose between materials and designs, the fire-performance check worth making, how to prepare the surface, and how to fit panels on a ceiling and on a wall.
TL;DR
- Choose lightweight panels designed for ceiling use, and check the maker’s fitting guidance before you buy.
- Ceilings are less forgiving than walls: gravity works against you, so surface preparation and the right adhesive matter more.
- Check the fire classification of any internal lining, particularly on escape routes or in shared and commercial spaces.
- Set out from the centre of the room, dry-lay first, and fit one panel at a time with a firm, even press.
- Wall installation follows the same logic, but you can work from a level baseline and use gravity to your advantage.
Table of Contents
- What are 3D ceiling panels?
- Ceiling panels versus wall panels
- Choosing the right panel for your ceiling
- Fire performance: the check to make before you buy
- Preparing the surface
- Tools and materials
- How to install 3D panels on a ceiling
- How to install 3D wall panels, and what changes
- Finishing touches and upkeep
- Our perspective on 3D ceiling panels
- Ready to start your project?
- FAQ
- Sources
What are 3D ceiling panels?
A 3D panel has a relief pattern: waves, diamonds, fluting, geometric facets or soft organic curves. Light falls across the raised surface and creates shadow, so the pattern changes through the day. On a ceiling, that effect is dramatic because the surface is often the largest uninterrupted plane in the room.
Panels come in a few materials:
- Polyurethane: light, rigid, crisp in detail and paintable. This is what we supply from Orac Decor and NOËL & MARQUET, and it suits both traditional and contemporary rooms.
- PVC: the thin plastic tiles you will see sold in large multipacks. They are cheap and very light, but the finish and detail are generally more basic.
- Plaster and gypsum: beautiful and traditional, but heavy and best fitted by a plasterer.
- Wood and MDF: excellent for slatted or fluted looks, but heavier overhead and more demanding to fix.
Weight is the deciding factor for ceilings. Every kilo you add has to be carried by adhesive and, in some cases, mechanical fixings, so a light polyurethane panel gives you the widest margin for a clean, secure result.
Ceiling panels versus wall panels
Most 3D panels are sold as wall panels, and many are suitable for ceilings as well, but the two jobs are not identical. Always confirm with the manufacturer’s instructions that a given profile is suitable for overhead use.
| Consideration | Ceiling | Wall |
|---|---|---|
| Gravity | Pulls panels away from the surface | Pulls panels down along it |
| Adhesive hold | Needs a firm initial grab and support while it cures | Easier to hold in place while it sets |
| Setting out | From the room centre, to keep pattern balanced | From a level baseline or a focal point such as a bed or TV |
| Working position | Overhead, tiring, so plan breaks and good access | Comfortable eye-level work |
| Visibility | Seen at an angle and in raking light | Seen straight on, so joints show more |
| Services | Light fittings, smoke alarms and roses to work around | Sockets, switches and radiators |
If you want the wall side of this in more depth, our guide to 3D wall panels for a feature wall covers pattern choice and placement.
Choosing the right panel for your ceiling
Pattern and scale
Large, bold patterns suit big rooms with generous ceiling height. In a small room or a low ceiling, softer relief or a smaller repeat avoids a heavy, crowded feel. If you want to frame space rather than fill it, consider panels across only part of the ceiling, such as a central recess, bordered with coving.
Style of the room
Traditional homes often look best with a restrained relief that echoes cornice detail. Modern interiors can take sharper geometry or a continuous wave. Either way, think of the panels as one layer in a scheme with the coving, ceiling rose, lighting and skirting.
Lighting
Relief is shown off by light. Raking light from one side exaggerates the shadows, while light from directly above flattens them. Concealed lighting in a profile around the edge can wash across the surface beautifully. Our Orac LED profiles guide explains how to choose and fit them, and our LED coving range pairs well with a panelled ceiling.
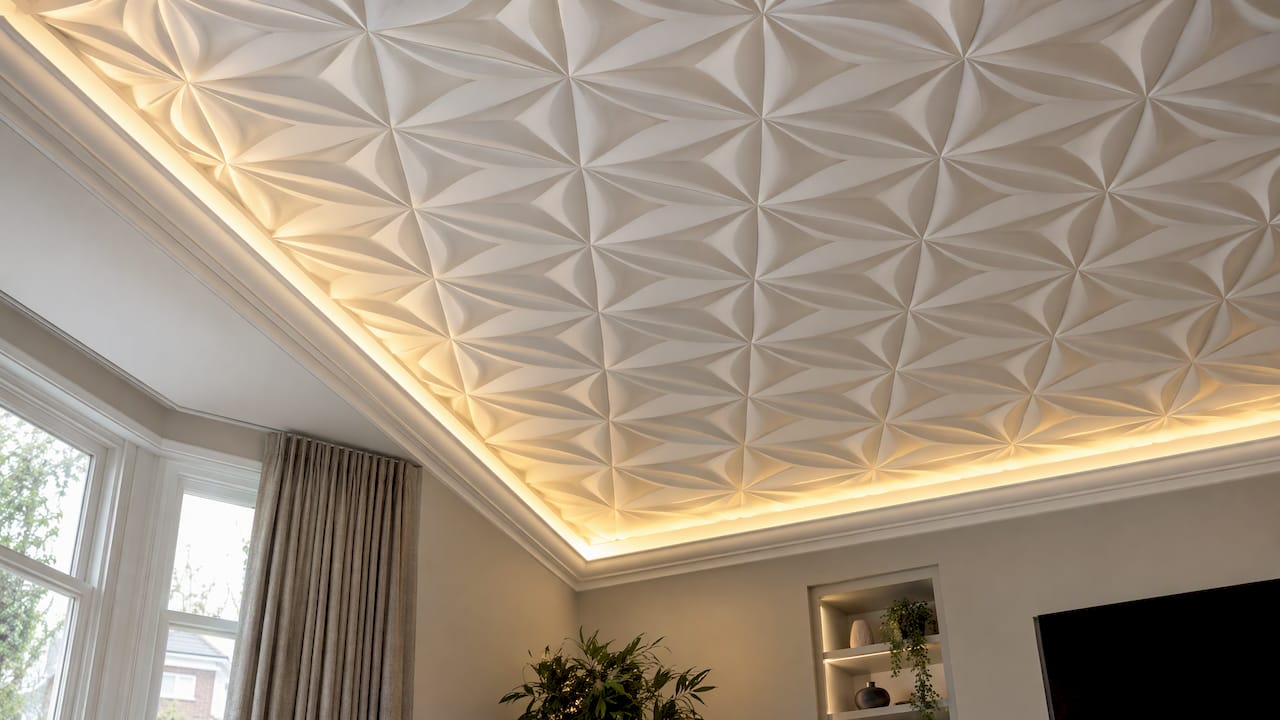
Finish
Most polyurethane panels arrive primed white and ready to paint. A matt emulsion keeps the shadows soft and hides small imperfections at joints. Satin or eggshell will highlight the relief but shows flaws more readily. In a kitchen or bathroom, choose a paint suitable for those conditions.
Fire performance: the check to make before you buy
Any panel you fix to a ceiling becomes an internal lining, and in the UK, linings are expected to meet fire-performance requirements. The government’s Approved Document B for dwellings sets out the classifications for wall and ceiling linings. In residential and minor spaces, an s3, d2 classification is often the threshold, while escape routes and high-traffic areas can require stricter s1, d0 performance with test documentation from the manufacturer.
In practice:
- Ask for the fire classification of the specific panel, not just the material type.
- Take extra care in hallways, landings, stairwells and communal areas, where stricter requirements may apply.
- If you are specifying for a hotel, restaurant, rental property or other commercial space, involve your building control body or fire risk assessor early.
- Keep the product documentation with your project records.
If you are unsure which rules apply to your property, building control at your local authority is the right person to ask.
Preparing the surface
Preparation decides whether a ceiling installation lasts. The adhesive is only as strong as the surface beneath it.
- Check the substrate. Tap and inspect the ceiling. Plasterboard should be firmly screwed, and plaster should be sound. Flaking, powdery or bouncing areas need repair first.
- Look for moisture. Stains, damp patches or mould mean you must fix the cause before anything goes up. Panels will not solve a leak.
- Remove loose finishes. Scrape off flaking paint, old textured coatings or wallpaper that is not tightly bonded.
- Clean and dry. Dust and grease reduce grip. Wipe down and let the surface dry fully.
- Prime if needed. Porous or newly plastered surfaces usually need sealing so they do not draw moisture out of the adhesive too quickly.
- Check flatness. Small dips are manageable. Large undulations will show as gaps between panels, so level them first.
- Plan around services. Locate cables, downlights and fixings. Isolate the power if you are working near any electrics, and have a qualified electrician handle any alteration to wiring.
Let the panels acclimatise in the room for a day or so before fitting, so they are at room temperature when you start.
Tools and materials
You do not need a lot of kit, but the right items make a real difference:
- Tape measure, pencil and a chalk line
- A laser level or long spirit level
- A fine-tooth saw and mitre box, or a sharp knife for trimming, depending on the profile
- A suitable adhesive and a caulking gun (see our adhesives and accessories)
- A decorator’s flexible filler or caulk for joints
- Masking tape and temporary supports such as props or tape
- Dust sheets, a dust mask and eye protection
- A stable platform or scaffold tower, not a chair
Use the adhesive the panel manufacturer recommends. Polyurethane mouldings are normally bonded with a purpose-made adhesive rather than all-purpose products, and the instructions will tell you the open time and cure time.
How to install 3D panels on a ceiling

1. Set out from the centre
Find the centre of the room by snapping chalk lines between opposite corners or between the midpoints of opposite walls. Starting at the centre keeps the pattern balanced, so you do not end up with thin, awkward slivers on one side.
2. Dry-lay
Place panels on the floor, or hold them up, to check the pattern match and how the edges fall. Adjust your start point until the cut panels at the perimeter are of a reasonable width. Number the back of each panel lightly in pencil so you can follow the order.
3. Apply adhesive
Follow the manufacturer’s instructions for the pattern of adhesive. Generally this means a continuous bead around the edge and further beads or dabs across the back, with enough contact to hold the panel without excess squeezing out at the joint.
4. Press and hold
Offer the panel up to your guide lines, press firmly and evenly, then slide it a few millimetres if needed to line up. Hold until the adhesive takes. On a ceiling, support the panel with tape or props until it has cured, and do not disturb it.
5. Butt the joints tightly
Work outwards, fitting each panel tight against the last. Wipe away squeezed-out adhesive straight away with a damp cloth, as hardened adhesive is difficult to remove from relief patterns.
6. Cut to fit at the edges
Measure each border panel individually, as rooms are rarely square. Cut slowly with a fine blade and dry-fit before gluing. A gap at the perimeter is normally hidden by coving, which is a good reason to plan the two together. Our cornice and coving range offers profiles to finish the edge neatly.
7. Fill, caulk and paint
Once everything has cured, fill the joints with a flexible filler, smooth with a damp sponge, and let it dry. Paint in thin coats. Spray application gets into relief detail more evenly than a brush, but a good roller and a small brush also work well.
Carl’s Installer Tip
In our experience, the biggest ceiling mistake is rushing the first panel. We’ve found that if panel one is out by even a couple of millimetres, the error grows across the whole room. Spend extra time checking your chalk lines, then fix the first panel and leave it to grab before continuing. Also keep a damp cloth in your pocket: wiping adhesive from relief detail while it is wet saves hours of fiddly cleaning later.
How to install 3D wall panels, and what changes
The process is very similar to a ceiling, with some practical differences that make walls easier for first-timers.
- Start from a level line. Mark a horizontal baseline with a laser or spirit level, and start from the bottom or from the focal point of the wall. Do not trust the skirting or floor to be level.
- Plan the pattern around features. Centre the layout on a chimney breast, bed or TV position so cuts fall in less visible corners.
- Work around sockets and switches. Isolate the circuit, mark and cut openings carefully, and use a qualified electrician if any wiring needs to change.
- Use gravity. On walls, panels can rest on a batten or spacer while they take, which is far easier than holding them overhead.
- Think about joints. Walls are viewed straight on in daylight, so tight, well-filled joints matter more.
For pattern ideas and room-by-room suggestions, see our 3D wall panels collection and the wall panelling guide.
Finishing touches and upkeep
A panelled ceiling looks best when everything around it is considered. Add coving at the junction with the walls, a ceiling rose if you are working around a central pendant light, and skirting to balance the room below. Our ceiling roses range and guide to choosing ceiling roses help with the central detail, and our ceiling detailing trends piece shows how these elements work together.
Upkeep is simple. Dust occasionally with a soft brush or a vacuum with a brush attachment, and wipe marks with a lightly damp cloth. When the time comes to repaint, a clean, light coat is better than a thick one, which can soften the relief.
For contractors who need extra labour to finish a project, hiring painters and decorators can help keep the schedule on track once the panels are up and cured.
Our perspective on 3D ceiling panels
We think 3D ceiling panels are one of the most underused ways to give a room real character. A ceiling is the largest surface in most rooms, and yet it is often left plain. A well-chosen relief changes how the whole space feels.
The best results come from treating the ceiling as part of a complete scheme. That is why we supply panels, coving, ceiling roses, skirting and lighting profiles together, so profiles and proportions work with one another. Our polyurethane mouldings from Orac Decor and NOËL & MARQUET are designed to be light, detailed and paintable, which makes them a sensible choice for overhead work.
We also know that confidence matters. Some homeowners are happy to fit panels themselves, while others would rather have a professional do it. Through our Elite Decor UK installer network, we can arrange professional installation across the UK, so you can choose the route that suits you.
Carl
Ready to start your project?
Browse our 3D wall panels, then add matching coving and cornice, LED profiles and adhesives to complete the scheme. We stock over 500 Orac Decor and NOËL & MARQUET products, and our team can advise on profiles for your room.

If you would rather not fit the panels yourself, we can arrange installation through our national installer network. Start at Coving.Online and tell us about your room.
FAQ
Can you put 3D wall panels on a ceiling?
Often yes, but only if the manufacturer states the profile is suitable for overhead use. Lightweight polyurethane panels are the most practical, as they place less load on the adhesive. Always follow the maker’s fitting instructions for ceilings.
What adhesive should I use for 3D panels?
Use the adhesive recommended for the panel material by its manufacturer. For polyurethane mouldings, that is normally a purpose-made moulding adhesive rather than a general product. Our shop lists adhesives suited to our ranges.
Do I need to prepare the ceiling first?
Yes. The surface should be sound, clean, dry and reasonably flat, and sealed with a primer if porous or newly plastered. Fix any damp or loose plaster before you begin, because adhesive cannot hold on a weak surface.
Are 3D panels a fire risk?
Internal linings must meet fire-performance requirements under the building regulations, with stricter classifications possible on escape routes and in busy spaces. Ask for the classification of the specific panel and check it against Approved Document B. Your local building control can confirm what applies to your property.
Can I arrange professional installation?
Yes. We can arrange professional fitting across the UK through our Elite Decor UK installer network. Get in touch via our homepage to discuss your project.
Sources
- Approved Document B: Fire safety, Volume 1 – Dwellings (2019 edition)
- Hiring painters and decorators
Recommended
- 3D Wall Panels UK for a Better Feature Wall
- How to Choose Ceiling Coving for Your Room
- Ceiling Mouldings for Uneven Walls That Work
